Introduction
Your Kubota's hydraulic pump drives the loader, three-point hitch, power steering, and remote circuits simultaneously. When it starts to fail, nearly every function degrades. Weak lift capacity, sluggish cycle times, and overheating don't just slow you down—they put your entire hydraulic and transmission system at risk.
Most failures follow predictable patterns. Catching the early warning signs is the difference between a manageable seal replacement and a full system flush. Left too long, a failing pump can contaminate the wet-clutch components sharing the same fluid reservoir—turning a simple repair into days of downtime.
This guide covers how to identify pump failure, diagnose root causes, work through repairs step by step, and decide whether rebuilding or replacing makes financial sense for your machine.
Key Takeaways
- Most Kubota hydraulic pump failures appear gradually: weak lift, slow cycles, whining noise, or overheating
- Neglected fluid maintenance, suction-side cavitation, and internal contamination cause the majority of failures
- Technicians can rebuild BX, B, L, and M series pumps as long as the housing remains undamaged
- Early pressure testing catches failure before it spreads — and typically costs far less than a full replacement
Common Signs of a Failing Kubota Hydraulic Pump
Most Kubota pump failures follow predictable, progressive patterns. Catching them early keeps a minor rebuild from turning into a full system replacement.
Slow or Weak Hydraulic Performance
- Loader rises sluggishly under load
- Three-point hitch struggles to lift implements
- Functions that operated at partial throttle now require full RPM
Internal gear wear reduces pump output volume. Degraded fluid viscosity can mask early deterioration, delaying diagnosis until damage spreads to downstream components.
Whining, Grinding, or Rattling Noises
- High-pitched whine during operation
- Grinding or rattling at startup
- Noise intensifies under load or during deadheading
Cavitation is the usual culprit — air enters the suction side, creating voids that implode and erode internal surfaces. Worn gears or low fluid levels cause the pump to run dry intermittently, accelerating that damage.
Overheating Hydraulic Fluid
- Fluid consistently runs above normal operating temperature
- Burnt smell or rapid fluid darkening between changes
A worn pump works harder to maintain pressure, generating excess heat as a byproduct. A stuck-open relief valve or restricted return line will produce the same result.
Metal Particles or Foamy Oil in the Filter
- Metallic debris, sludge, or rubber chunks in the suction screen or filter element
- Milky or foamy oil in the reservoir
Metal particles signal advanced internal wear of gears or housings. Foamy oil points to aeration — air introduced through suction leaks that disrupts flow and accelerates pump damage. Either finding means the pump needs inspection before contamination reaches downstream components.
Root Causes of Kubota Hydraulic Pump Failure
Most Kubota pump failures are preventable — and the data points clearly to why they happen. Industry research shows that over 75% of all hydraulic system failures stem directly from contamination, with fluid and filter neglect leading the list.
Primary Failure Causes
Fluid and filter neglect:
- Silt (0-5 microns) accumulates over time, causing gradual abrasive wear
- Hard particles (5+ microns) bridge moving surfaces, scraping material and causing catastrophic failure
- Degraded anti-wear additives leave gears and housings unprotected
Suction-side cavitation:
- Restricted inlet flow creates fluid voids that implode, breaking away internal surface material
- Collapsed suction hoses, loose clamps, or low fluid levels allow air ingestion
- Aeration accelerates oxidation and corrosion, producing sludge and particulates
Overpressure from relief valve issues:
- Stuck or improperly adjusted relief valves force the pump to work beyond design limits
- Continuous high-pressure operation overheats fluid and accelerates seal failure
Internal contamination from prior component failures:
- Metal shavings from transmission gears or degrading wet brake components circulate into the pump
- Rubber particles from degraded hoses or seals act as abrasives
Drive coupler misalignment:
- Improper installation or worn mounting hardware causes vibration and uneven gear loading
Consequences of Unaddressed Root Causes
Each of these failure modes reinforces the others — leave one unaddressed and the damage escalates fast:
- Reduced lift capacity and slower cycle times
- Accelerated wear across valves, cylinders, and control spools
- Overheating that breaks down fluid additives and damages seals
- Full system shutdown requiring pump and valve replacement
The Shared Sump Risk
What makes this especially costly on Kubota equipment is the shared sump design. On BX, B, L, and M series tractors, the hydraulic and transmission systems share the same fluid reservoir. A pump failure that sends metal particles into circulation threatens not just the pump but the entire wet-clutch and HST transmission. This makes early diagnosis especially important—a $200 seal repair caught early prevents a $3,000 transmission rebuild.
How to Repair a Kubota Hydraulic Pump: Step-by-Step
Attempting repair without confirming the pump is the actual problem leads to unnecessary disassembly, wasted parts, and repeat failures — isolate the fault before you touch a wrench.
Step 1: Confirm the Pump Is the Problem
Perform a hydraulic pressure test:
- Connect a glycerin-filled gauge to a loader work port or pump discharge port
- Start the engine and bring to operating RPM
- Activate the loader lift circuit and observe pressure
Typical pressure ranges by series:
- BX series: 2,200–2,500 PSI
- B series: 2,400–2,700 PSI
- L series: 2,500–2,800 PSI
- M series: 2,700–3,000 PSI
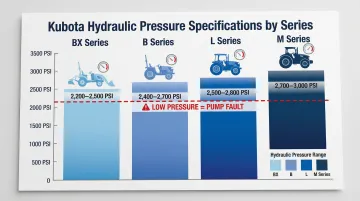
Low pressure at the pump outlet—with a new filter installed and suction hose confirmed intact—indicates internal pump wear or leakage. Normal pressure with weak function points to valve or cylinder issues.
Rule out external factors first:
- Verify fluid level and type are correct (Kubota UDT or Super UDT2)
- Replace the hydraulic filter and inspect the element for debris
- Visually inspect the suction hose for collapse, cracks, or loose clamps
Step 2: Remove and Disassemble the Pump
Safe shutdown procedure:
- Lower all implements to relieve hydraulic pressure
- Cycle controls with the engine off to release residual pressure
- Disconnect the battery
- Drain fluid below pump level
- Tag and cap all lines before disconnecting
Mark pump orientation:
- Use a permanent marker to indicate top/bottom, front/rear, and section alignment
- This ensures correct reassembly and prevents cross-threading
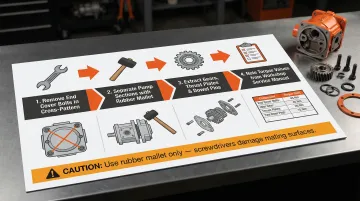
Disassembly steps:
- Remove end cover bolts in a cross-pattern sequence to prevent warping
- Separate pump sections — use a rubber mallet if sections are stuck, not a screwdriver
- Extract gears, thrust plates, and dowel pins
- Note torque values from the Workshop Service Manual for reassembly
Step 3: Inspect Components and Apply the Correct Fix
For mechanical damage (worn gears, scored housing, damaged shaft):
Inspect for:
- Gear tooth pitting or spalling (flaking metal)
- Deep scoring in the housing bore that you can feel with a fingernail
- Shaft play or discoloration at the bearing surface
- Cavitation pitting on gear faces
Decision rule: Components with fingernail-detectable grooves should trigger replacement rather than rebuild. Light burnishing is acceptable; deep scoring is not.
For seal or minor wear issues (shaft seal leak, worn O-rings, lightly burnished end plates):
- Clean all reusable parts in solvent and dry thoroughly
- Lubricate new O-rings and seals with clean hydraulic fluid
- Install the shaft seal with the lip facing the oil side
- Reassemble with correct cross-pattern torque per WSM specifications
Operators without access to model-specific torque specs or seal drivers should send the unit to a rebuild specialist like Hydrostatic Pump Repair rather than risk improper assembly.
With the pump correctly rebuilt or replaced, reinstallation follows a straightforward sequence.
Step 4: Reinstall, Prime, and Test
Pre-fill procedure:
- Fill the pump inlet port with clean hydraulic fluid before installation
- Rotate the shaft by hand to verify smooth operation with no binding
- Reinstall using correct mounting bolt torque from the WSM
- Reconnect all lines with new O-rings or crush washers at fittings
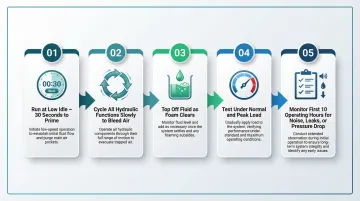
Startup and break-in:
- Run at low idle for 30 seconds to prime the system
- Cycle all hydraulic functions slowly to bleed air
- Top off fluid as foam clears
- Test under normal and near-peak load conditions
- Monitor for recurrence of noise, pressure drop, or leaks over the first 10 operating hours
Rebuild vs. Replace: Which Option Is Right for You?
The rebuild-or-replace decision comes down to housing condition, pump history, tractor use case, and cost. Neither option is universally correct, and making the wrong call costs time and money.
Scenario 1: Light Wear or Shaft Seal Failure
If the housing shows no visible scoring, gear teeth have only light burnishing, and the failure is limited to a shaft seal leak or worn O-rings, a seal kit rebuild is the cost-effective choice. That said, if the tractor runs commercially and downtime carries real costs, a new aftermarket pump eliminates the near-term risk of a repeat seal failure.
Scenario 2: Moderate Internal Wear With Sound Housing
When gears show moderate wear but no pitting or spalling, the housing bore is smooth, and the pump has a solid maintenance history, a full rebuild restores function at a fraction of replacement cost. If the pump has already been rebuilt once—or the tractor carries very high hours—a remanufactured or quality aftermarket pump offers better long-term reliability.
Scenario 3: Heavy Cavitation Pitting or Scored Housing
Rebuild is not recommended here. Cavitation pitting on gear faces and deep housing bore scoring cannot be corrected by seal replacement alone — a rebuilt unit will fail prematurely under these conditions.
Replacement is the right call. Expect to pay $400–$800 for aftermarket compact tractor pumps or $900–$1,500 for OEM units, depending on series and configuration.
Scenario 4: Contamination Event (Metal Shrapnel Through System)
Rebuild is not appropriate when the failure sent metal particles system-wide. A rebuilt pump installed into a contaminated system will fail again quickly — the root cause hasn't been addressed.
Replacement requires a full system flush before any new or rebuilt pump goes in. Skipping that step negates the investment. A professional hydraulic repair service with full rebuild and remanufacturing capabilities can handle this scenario end-to-end, ensuring the new pump enters a clean system.
Preventive Maintenance and Common Mistakes to Avoid
The majority of Kubota hydraulic pump failures are preventable. Inadequate fluid conditions are responsible for up to 80% of all hydraulic system failures, and consistent maintenance stops the contamination and fluid degradation that drive most early pump failures.
Preventive Actions
Check fluid level before every use:
- Low fluid allows air ingestion and pump cavitation
- Top off only with Kubota UDT or Super UDT2
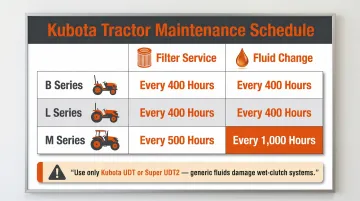
Replace hydraulic filter on schedule:
| Tractor Series | Hydraulic Filter Interval |
|---|---|
| B Series | Every 400 hours |
| L Series | Every 400 hours |
| M Series | Every 500 hours |
Perform full fluid change at manufacturer intervals:
- B and L series: Every 400 hours
- M series: Every 1,000 hours
- Use only Kubota UDT or Super UDT2—generic substitutes lack friction modifiers required for wet-clutch systems and damage seals
Inspect suction hose annually:
- Look for soft spots, cracks, or loose clamps that allow air ingestion
- Replace hoses showing any signs of deterioration
Even with a solid maintenance routine, certain repair habits consistently lead to repeat failures. Here are the mistakes that undo otherwise good work:
Common Mistakes to Avoid
- Adjusting relief valve pressure without testing pump output first. This treats the symptom, not the cause — and sets you up for the same failure in a few hundred hours. Always pressure-test the pump before condemning it.
- Installing a new pump into contaminated fluid. A full system flush is mandatory after any metal contamination event. Skip it and the new pump fails fast.
- Using aftermarket seals or generic hydraulic fluid. Seals not spec'd for Kubota pumps fail prematurely. Generic fluids lack the friction modifiers wet clutches and HST transmissions require.
- Skipping a load test at the end. Intermittent failures only show up under working conditions. Don't declare the job done until you've run the tractor through its normal tasks.
Frequently Asked Questions
What are the symptoms of a bad Kubota hydraulic pump?
The most common warning signs are slow or weak loader lift, whining or grinding noise under load, hydraulic fluid overheating, and metal debris found in the filter during service. These symptoms typically appear gradually rather than as sudden complete failure.
What are the most common causes of Kubota hydraulic pump failure?
Neglected fluid and filter maintenance, suction-side cavitation from a collapsing hose or low fluid level, and internal contamination from a prior component failure are the leading causes. Most are preventable with regular fluid changes, filter inspections, and catching suction-side leaks before they progress.
Can a Kubota hydraulic pump be repaired?
Most Kubota gear pumps can be rebuilt when the housing bore and gear teeth show only light wear. Seal kits and components are available through Kubota dealers and aftermarket suppliers, making professional rebuild a cost-effective option when the housing is structurally sound.
How much does it cost to repair a Kubota hydraulic pump?
Professional rebuild typically runs $300–$600 depending on the series and labor involved. DIY seal kit rebuilds cost $50–$150 for parts alone, while new aftermarket pumps run $400–$800 and OEM replacements $900–$1,500 for compact tractor models.
How do I know if my Kubota hydraulic pump needs to be rebuilt or replaced?
A pump with light wear, a sound housing, and no prior rebuilds is a strong rebuild candidate. Scoring you can feel with a fingernail on the bore, heavy cavitation pitting, or a pattern of repeat failures are signs a professional should evaluate whether replacement is the more reliable long-term choice.
What hydraulic fluid should I use in my Kubota tractor?
Kubota recommends UDT or Super UDT2 for most compact tractor models. Never substitute generic hydraulic fluids — most Kubota systems share fluid with the HST transmission and require specific friction modifiers that generic fluids lack.