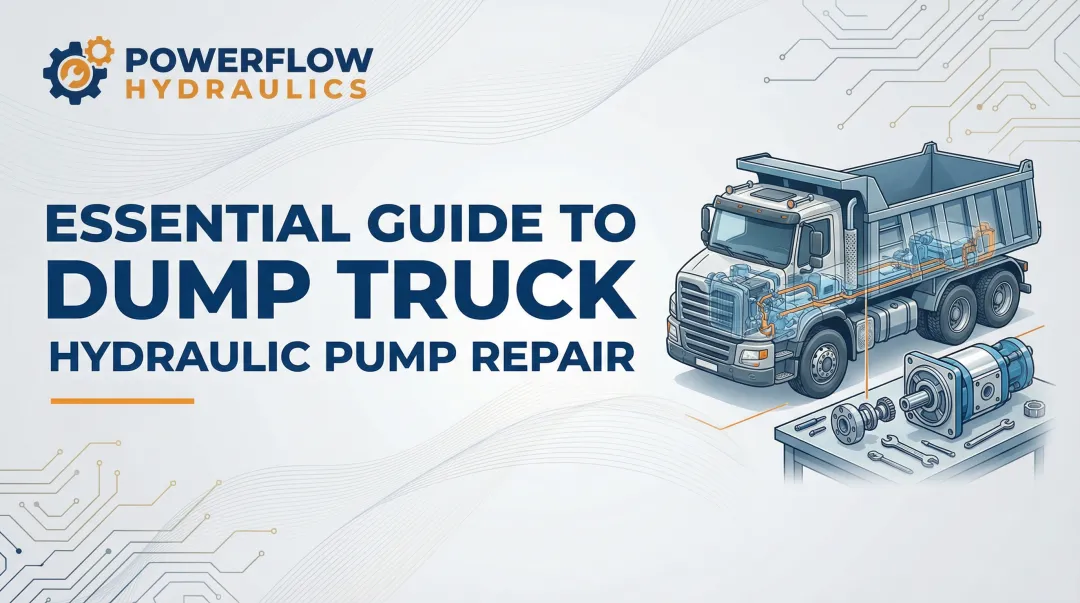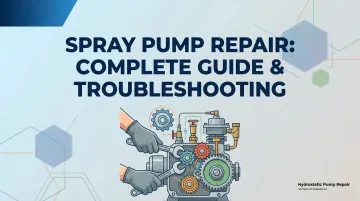
Introduction
A spray pump failure mid-season doesn't wait for a convenient time. Delayed crop protection, halted sanitation runs, stalled production lines—the cost adds up fast. According to Oregon State University Extension, diaphragm pumps typically last 1,000 hours under normal use, but most failures happen well before that due to maintenance gaps, chemical exposure, or operational stress.
This guide covers how to diagnose the problem accurately, walk through a repair step by step, and know when rebuilding or professional service is the right move—so you spend less time troubleshooting and more time running.
Key Takeaways
- Most spray pump failures stem from worn seals, clogged valves, damaged diaphragms, or loss of prime
- Component-level repairs often resolve the problem without full pump replacement
- Proper diagnosis before disassembly prevents repeat failures and unnecessary part spending
- Internal corrosion, seized components, or repeated failures are signals to replace rather than repair
What Is a Spray Pump?
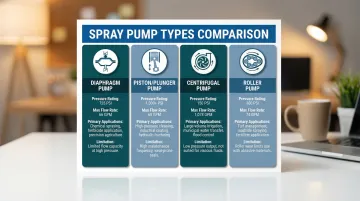
A spray pump is a mechanical device that pressurizes liquid and moves it through a spray system. Four primary types dominate agricultural, pest control, and industrial applications:
- Diaphragm pumps — Deliver up to 725 psi and 66 gpm, ideal for high-pressure foliar spraying and orchards; fluid is separated from mechanical parts by an elastomer diaphragm, making them excellent for abrasive or corrosive chemicals
- Piston/plunger pumps — Achieve 1,000+ psi and 68 gpm with precise, consistent flow; used in fertigation, metering, and high-pressure cleaning but less forgiving to abrasive solids
- Centrifugal pumps — Handle up to 150 psi and 1,078 gpm for high-volume transfer and large boom sprayers; highly durable with wettable powders but cannot run dry
- Roller pumps — Operate up to 300 psi and 74 gpm for small boom sprayers and turf care; low-cost and self-priming, but nylon/Teflon rollers wear quickly with abrasive suspensions
Spray pumps degrade over time due to chemical exposure, pressure cycling, and wear on internal components like seals, valves, and diaphragms. Knowing which pump type you're working with directly shapes how you diagnose failures and which components to inspect first — a key starting point for any repair.
Common Problems With Spray Pumps
Spray pump failures tend to show up in four recognizable ways. Match your symptom to the section below to narrow down which component needs attention.
Low Pressure or Weak Output
Symptoms: Pump builds no pressure, output stream is weak or inconsistent
Common causes:
- Worn piston O-rings or damaged diaphragm
- Faulty pressure relief valve stuck in open position
- Clogged inlet filter reducing flow
- Worn or plugged nozzles
- Belt slippage on belt-driven pumps
Fluid Leaking From the Pump
What you'll notice: Visible liquid around pump body, connections, or valve housing during operation
Likely Cause:
- Degraded O-rings at connection points
- Cracked pump housing or valve body
- Loose fittings or hose clamps
- Failed shaft seal or wet-end seals
- Chemical incompatibility with sealing materials accelerating degradation
Motor Runs But No Liquid Moves
Symptoms: Motor or piston cycles normally, but no liquid moves through the system
What's likely wrong:
- Loss of prime (air trapped in inlet line)
- Blocked inlet valve or strainer
- Collapsed suction hose under negative pressure
- Failed umbrella/check valve preventing one-way flow
- Valves seating improperly or installed backward
Excessive Noise or Vibration
Symptoms: Rattling, cavitation noise, or abnormal mechanical knocking during pump operation
Common causes:
- Cavitation from a blocked or undersized inlet
- Worn or loose internal components
- Air ingestion through a cracked hose or loose fitting
- Pump running dry or with insufficient fluid
- Incorrect pulsation dampener pressure setting
Why Spray Pumps Fail: Root Causes
Operational Stress
Running the pump dry, exceeding rated pressure, or using the wrong pump type for the chemical being sprayed accelerates internal wear and component failure. Major pump manufacturers strictly limit dry-running to a maximum of 30 seconds—typically only permitted to purge fluid before winter storage. Running a positive displacement pump without fluid causes rapid, severe, irreversible damage: friction generates extreme heat that destroys seals, packings, and mechanical components.
Chemical incompatibility compounds these mechanical stresses, degrading seals and diaphragms from the inside out.
Environmental and Chemical Exposure
Residue buildup from wettable powders, acidic or solvent-based chemicals, and freezing temperatures degrade seals, diaphragms, and valve materials faster than normal wear. Chemical incompatibility is a leading cause of premature seal failure:
- Buna-N (Nitrile) — Good for general water and standard fertilizers, but vulnerable to ketones, acetates, and highly acidic solutions
- EPDM — Excellent for acidic herbicides and fertilizers, but rapidly degrades when exposed to petroleum-based oils and hydrocarbon solvents
- Viton (FKM) — Offers the widest chemical compatibility, including resistance to petroleum products and harsh solvents. The tradeoff: higher cost and lower abrasion resistance compared to Buna-N

Maintenance Gaps
Failing to flush the pump after use, skipping seasonal storage prep, and not replacing wear parts on schedule drive the majority of premature failures. Leaving chemicals in the pump overnight causes diaphragm swelling and softening — even a single night matters with certain herbicide formulations.
Wettable powders and suspension fertilizers settle and harden in pump cavities over winter. By spring, dried residue causes severe abrasion to valves and seals the moment the pump starts. Ignoring early warning signs leads to seized components, contaminated output, and full replacements that a simple flush could have prevented.
How to Fix a Spray Pump: Step-by-Step
Attempting a repair without first confirming the root cause wastes time, risks introducing new damage, and often results in repeat failure within the same season.
Step 1: Identify the Exact Problem
Observe visible symptoms:
- Check for leaks at specific joints and connections
- Listen for abnormal noise (cavitation, knocking, rattling)
- Test whether pressure builds and holds after pumping
Document when the issue occurs:
- At startup, under load, after sustained use, or continuously
- This narrows the likely failure point before disassembly
Step 2: Confirm the Root Cause
Determine whether the failure is:
- Mechanical — Degraded seals, failed valves, or a cracked/stiff diaphragm
- Flow-related — Air in the system, a collapsed suction hose, or a clogged strainer
- Environmental — Chemical incompatibility, corrosion from mineral buildup, or freeze damage to housings
Rule out external factors first:
- Check that the inlet strainer is clear
- Inspect suction hose for cracks or collapse
- Verify tank has adequate fluid
- Confirm all connections are tight
Check these before disassembly — they resolve most issues at zero cost.
Step 3: Perform the Repair
If the Issue Is Mechanical (Seals, Valves, Diaphragm)
Disassemble the pump cylinder:
- Remove the piston or diaphragm assembly
- Inspect O-rings, gaskets, and valve seats for cracking, deformation, or chemical swelling
- Check valve orientation—plastic cages typically face up/outward on discharge
With the components exposed, assess each part individually before ordering replacements. Replacing only the visibly failed part without inspecting adjacent seals often leads to a second teardown within weeks.
Replace worn components:
- Replace O-rings and seals with components rated for the chemical being sprayed
- Lubricate all seals with non-water-soluble grease before reassembly
- Ensure gaskets seat flat to prevent post-repair leaks
- For diaphragm pumps, inspect the diaphragm for punctures or stiffness and replace as a matched set if needed
- Check umbrella/check valves for proper seating and replace if they no longer seat cleanly
Reassembly critical steps:
- Turn the crankshaft to bring the piston to bottom-dead-center to properly seat the new diaphragm into the sleeve groove
- Apply blue threadlocker to retaining bolts and torque to OEM specifications
If the Issue Is Flow or Prime Loss
Clear blockages:
- Remove and clean the inlet filter, strainer, and nozzle tips
- Inspect the suction hose for cracks or collapse under negative pressure
- Replace any damaged hoses or fittings
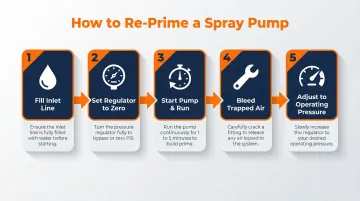
Re-prime the pump:
- Fill the inlet line with water before starting
- Set the pressure regulating valve to bypass or zero pressure
- Start the pump and run for 1-5 minutes to evacuate air pockets
- Crack a fitting to bleed trapped air if necessary
- Slowly adjust the regulator to desired operating pressure once flow resumes
If the Issue Involves Electrical Components (Powered Spray Pumps)
Inspect electrical connections:
- Check motor connections, wiring terminals, and pressure switch for corrosion or loose contacts
- Test voltage at the motor under load
Test and replace faulty components:
- Reset or replace the pressure switch if the pump cycles erratically
- Verify the motor draws current within its rated range
- Sustained overcurrent (current draw consistently above the motor's rated amperage) suggests a mechanical bind requiring internal inspection
Step 4: Test and Validate
Reassemble and test:
- Fill the system and run the pump through normal operating pressure
- Monitor for leaks at all repaired connections
- Confirm output matches the pump's rated flow
Once flow and pressure confirm the repair held, move to a sustained load test to catch any remaining issues before the pump returns to service.
Run under load:
- Operate under peak load for a sustained period
- Check that pressure holds steady
- Verify no seepage appears at seals or joints
- Confirm the pump runs quietly before returning to service
When to Fix vs. Replace Your Spray Pump
The fix-or-replace decision comes down to three factors: repair cost relative to replacement, the pump's age and overall condition, and the likelihood of a secondary failure once it's back in the field.
Scenario 1: Isolated Seal, O-Ring, or Diaphragm Failure
Fix: Replace the specific wear component. Repair kits are widely available and cost a fraction of a new pump. Diaphragm and valve kits are stocked across most major suppliers, and the targeted repair is far cheaper than a full replacement. This is the most common — and most straightforward — spray pump failure to resolve.
Scenario 2: Cracked Housing or Corroded Pump Body
Replace: Structural damage to the pump body is rarely worth repairing. The repair cost approaches or exceeds a new pump, and structural integrity cannot be fully restored. A cracked housing also signals that the pump has been subjected to severe stress or freezing damage.
Scenario 3: Recurring Failures on an Aging Pump
Fix first if it's a single worn component, but replace if the pump has required multiple repairs in one season or is beyond its expected service life. A common rule of thumb: if a repair quote exceeds 40% of the cost of a comparable new pump, replacement is the smarter financial decision.
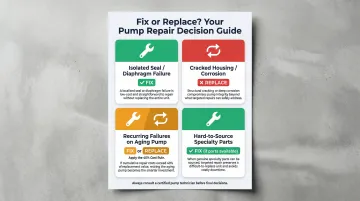
Scenario 4: Hard-to-Source Parts for Specialty or Industrial Pumps
Fix — but only if you can actually source the parts. For specialty and industrial spray pump assemblies, standard distributors often come up empty. That's where a repair service with an extensive OEM manufacturer reference database changes the equation. Hydrostatic Pump Repair covers components across thousands of manufacturers, making it possible to rebuild assemblies that would otherwise force a full replacement. Call 800-361-0028 when standard sourcing channels fall short.
Preventive Maintenance and Common Mistakes to Avoid
Most spray pump failures are preventable. The habits below separate pumps that last a decade from those that fail mid-season.
Flush the Pump After Every Use
- Run clean water through the pump after every chemical application
- Residue from wettable powders and concentrates is the leading cause of valve clogging and diaphragm degradation
- Leaving chemicals overnight causes diaphragm swelling and valve damage
Replace Wear Parts on Schedule
Major OEMs recommend diaphragm replacement and crankcase oil changes every 500 hours or 3 months of use. Valve replacement follows at 1,000 hours.
- New or newly rebuilt pumps need an initial break-in oil change after the first 40–50 hours
- Inspect and replace O-rings, seals, and strainers on a schedule — not after failure
Diagnose Before You Order Parts
The most common repair mistake: replacing parts based on a symptom rather than a confirmed root cause. Swapping an O-ring when a clogged inlet valve is the real problem leaves the underlying issue in place and sets up the next failure. Always confirm the root cause first.
Store Pumps Properly for Off-Season
- Drain all fluid, then run the pump dry for no more than 30 seconds to evacuate residual water
- Fill with a 50/50 mix of water and RV antifreeze (propylene glycol) — Purdue Extension warns that automotive ethylene glycol's corrosion inhibitors degrade plastic parts and pump seals
- Lubricate seals and store away from freezing temperatures
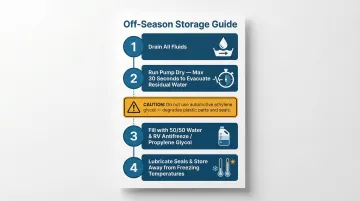
Skipping winterization is one of the most common causes of cracked pump bodies and failed diaphragms discovered at the start of a new season.
Frequently Asked Questions
How much does spray pump repair cost?
Repair costs range from $20-$75 for basic seal and O-ring kits to $110-$208 for comprehensive diaphragm and valve kits. Professional rebuild services typically cost $250-$450 for minor rebuilds. Catching problems early prevents secondary damage that drives costs higher.
Can a spray pump be repaired without replacing it?
Yes. Most issues—seal failure, diaphragm damage, valve wear—can be fixed at the component level for a fraction of full replacement cost.
Why has my spray pump stopped working?
The most common causes are loss of prime (air trapped in inlet), a blocked inlet strainer, a failed check valve, or worn seals. Start at the inlet—check the strainer and suction hose before opening the pump head.
How long do spray pumps last?
Lifespan depends on pump type, chemical exposure, and maintenance. Cat Pumps reports that seals and packings last a minimum of 1,500 hours, valves last 3,000+ hours, and ceramic plungers exceed 10,000 hours. Diaphragms typically last 1,000 hours, but preventive replacement is recommended at 500 hours.
Is it worth replacing a pump on a pressure washer?
For newer or commercial-grade machines, rebuilding is almost always worth it—triplex plunger pumps are designed for it. For older or entry-level axial pump units, if the repair quote exceeds 40% of a comparable new pump's cost, replacement makes more financial sense.