Introduction
If your Farmall Cub is struggling to lift implements or leaking hydraulic fluid, the culprit is almost always the gear-type pump at the center of its Touch-Control system. Over 252,000 Cubs were built between 1947 and 1979, and that engine-mounted pump powers every one of them — it's also the first thing to wear out.
The pump's design is straightforward, but its tight internal tolerances make it sensitive to age, contaminated fluid, and neglect. Once it starts to go, performance drops fast.
When your Farmall Cub's hydraulic pump starts to fail, you'll notice weak implement lift, fluid leaks around the pump body, and erratic operation that worsens as the tractor warms up. The good news? A proper rebuild can restore full hydraulic performance without replacing the entire system — often at a fraction of the cost of a new pump.
This guide walks you through everything you need to know: how the pump works, how to diagnose failure, a complete step-by-step rebuild process, and—critically—how to determine when rebuilding no longer makes sense and replacement is the smarter call.
Key Takeaways
- The Farmall Cub uses a gear-type hydraulic pump that commonly fails due to worn gears, shaft seal deterioration, and excessive internal clearances
- Most pumps can be successfully rebuilt using a seal and gasket kit, provided gear and housing wear remain within acceptable tolerances
- Rebuild steps: drain, disassemble, clean, measure clearances, replace all soft parts, and torque to spec
- Replace the pump if gear clearances exceed 0.005", housing is scored or cracked, or post-rebuild pressure stays low
What Is the Farmall Cub Hydraulic Pump?
The Farmall Cub hydraulic pump is a gear-type pump mounted directly to the engine and driven by the camshaft gear within the timing gear train. This pump is responsible for generating the flow and pressure that operate the Touch-Control system—the hydraulic circuit that raises and lowers implements attached to the rockshaft.
Inside the pump, two meshing gears rotate within a precisely machined housing. The sequence is straightforward:
- Expanding chambers on the inlet side draw hydraulic fluid from the reservoir
- Fluid travels around the outside of the gears toward the discharge side
- Contracting chambers on the outlet push fluid under pressure to the control valve and cylinder
Few parts can fail, but those parts wear predictably over time.
As the pump ages, gear-to-housing clearances gradually increase, seals harden and crack, and internal leakage grows. The pump doesn't fail suddenly; it degrades slowly until performance becomes unacceptable. For most Farmall Cub owners, a hydraulic pump rebuild or replacement is part of the ownership experience, much like rebuilding a carburetor or replacing ignition components.
Common Signs Your Farmall Cub Hydraulic Pump Is Failing (and Why)
Most hydraulic pump failures follow predictable patterns. Catching these symptoms early prevents damage to the rest of the system and keeps repair costs manageable.
Weak or Slow Implement Lift
This is the classic sign of low pump output pressure. When gear-to-housing clearances grow beyond specification, pressurized fluid bypasses internally from the discharge side back to the inlet side instead of flowing to the cylinder. The problem worsens as the tractor warms up because hot hydraulic fluid has lower viscosity and slips through worn clearances more easily. If your Cub lifts implements fine when cold but struggles after 20 minutes of operation, worn gear clearances are almost certainly the culprit.
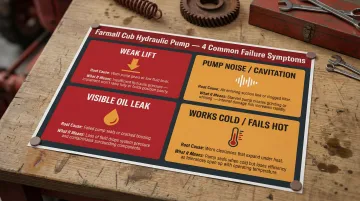
Whining, Squealing, or Cavitation Noise
Unusual pump noise points to air ingestion or cavitation. A failing shaft seal allows air to be drawn into the pump inlet, while low fluid levels starve the pump entirely. Cavitation occurs when fluid velocity changes rapidly and pressure drops below the fluid's vapor pressure, causing bubbles to form and violently collapse.
That implosion concentrates enormous energy on microscopic areas, pitting gears, thrust plates, and housing walls. Cavitation accelerates wear exponentially — what starts as a simple seal replacement can become a full housing replacement if ignored.
Visible Oil Leaks at the Pump
External leaks typically originate from two places: the shaft seal or the pump body gaskets. Shaft seal failure is the more common issue and results from normal wear, contamination scoring the seal lip, or age-related hardening. Leaks at the pump mounting surface or end cover indicate gasket deterioration. The distinction matters because a shaft seal can often be replaced without full disassembly, while body gasket leaks require removing and opening the pump.
System Works Cold but Fails Under Load or When Hot
This symptom points directly to excessive gear clearances combined with viscosity breakdown. Cold, thick fluid maintains enough pressure even through worn clearances — but as temperature rises and viscosity drops, internal bypass overwhelms the pump's output. At that point, the pump is no longer borderline worn; it's failed. A rebuild is the only reliable fix.
How to Rebuild the Farmall Cub Hydraulic Pump (Step-by-Step)
Before you begin before you begin: Cleanliness is the single most important factor in a successful hydraulic pump rebuild. Even microscopic contamination introduced during reassembly will score new seals and accelerate gear wear faster than the original failure. Work in a clean environment, use clean tools, and never reuse dirty fasteners or fittings.
Step 1: Gather Tools, Parts, and References
Tools required:
- Standard wrenches and sockets (SAE sizes)
- Torque wrench (0-50 ft-lbs range)
- Feeler gauges (0.001"–0.010" range)
- Seal pick tools (non-marring)
- Soft-faced mallet
- Micrometer or dial indicator (optional but recommended)
- Clean drain pan
- Parts cleaner or solvent
- Lint-free shop rags
- Compressed air source
Parts needed: At minimum, you'll need a complete rebuild kit containing all seals, O-rings, gaskets, and the shaft seal. For Farmall Cub pumps (IH part numbers 352035R92 through R95), complete 18-piece kits are available from specialist suppliers like Steiner Tractor Parts and Burch Store Tractors. Early pumps (352035R91) require an additional front seal not included in standard kits.
Important: You won't find rebuild kits for vintage Farmall Cub pumps at typical auto parts stores or farm supply chains. Specialist hydraulic parts suppliers who focus on vintage agricultural equipment—such as Hydrostatic Pump Repair—are often the most reliable source for hard-to-find components and can provide guidance on compatibility.
Service manual: Do not attempt this rebuild without the correct International Harvester service manual or a detailed exploded parts diagram. Torque specifications and assembly sequences are not guessable on precision hydraulic components.
Step 2: Drain the System and Remove the Pump
Park the tractor on level ground and lower all attached implements fully. With the engine off, cycle the Touch-Control lever several times to relieve residual pressure in the system. Place a clean drain pan under the pump and drain the hydraulic fluid completely.
Disconnect the inlet and outlet hydraulic lines from the pump body, labeling each line clearly to avoid confusion during reinstallation. Unbolt the pump from its mounting on the engine block, noting the exact orientation of the drive gear before removal.
Take photos if necessary. Reinstalling the pump with the drive gear reversed will cause immediate failure.
Step 3: Disassemble the Pump
Work on a clean bench covered with clean shop towels or paper. Remove the end cover bolts in a cross pattern to avoid warping the cover. Carefully lift the end cover straight up to avoid dragging it across the housing's machined sealing surface.
Extract the drive gear and idler gear, noting their exact orientation and which face was against which surface.
Warning: The machined faces of the end cover and pump body are precision-lapped sealing surfaces. Any scratch, gouge, or burr on these surfaces will cause internal leakage that no amount of new seals can fix. Handle these parts with extreme care.
Step 4: Clean and Inspect All Components
Soak all metal parts in parts cleaner or solvent, using soft brushes to clean internal passages and gear teeth. Blow dry with compressed air—never use shop rags on precision surfaces, as lint contamination will ruin your rebuild.
Key measurements to take:
Using feeler gauges, measure the following clearances:
- Gear tip-to-housing clearance: Insert the feeler gauge between the gear tooth tip and the housing bore at multiple points around the circumference
- Gear side clearance: Measure the gap between the gear face and the end cover/body with the gear installed
- End cover flatness: Check for warping using a straightedge and feeler gauge
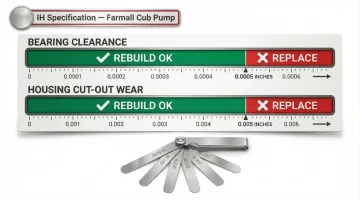
According to International Harvester specifications, bearing clearance between the bearing flats and pump body must not exceed 0.0005 inches. Housing cut-out (wear ridge) must not exceed 0.005 inches. If your measurements exceed these limits, the pump is not a good candidate for rebuild. Proceed to the "Rebuild vs. Replace" section below.
Step 5: Replace All Seals, Gaskets, and the Shaft Seal
Lay out all new parts from the rebuild kit and match each to the component it replaces before installation. Lip seals must be pressed in squarely with the correct orientation—the seal lip always faces the pressure side. Use a seal driver or appropriately sized socket to press seals flush without cocking them in the bore.
Key technique: Lubricate all new O-rings and seals with clean hydraulic fluid before assembly. Never install seals dry, and never twist O-rings as you install them in their grooves. Handle O-rings gently to avoid nicking or stretching.
Step 6: Reassemble, Reinstall, and Test
Reinstall the gears in their original orientation. Place the end cover onto the pump body, ensuring the gasket seats properly. Install end cover bolts and torque them evenly in a cross pattern to specification.
For 3/8" bolts threading into aluminum, approximately 25 ft-lbs is typical; for 5/16" bolts, approximately 20 ft-lbs. Consult your service manual for exact specifications.
Install a new shaft seal and mount the pump to the tractor using a new mounting gasket. Reconnect hydraulic lines, ensuring all fittings are clean and properly torqued. Refill the system with the correct hydraulic fluid—for Farmall Cub Touch-Control systems, this is IH Touch-Control Fluid or its modern equivalent, Case IH Hy-Tran.
Testing procedure:
- Start the engine at low idle
- Cycle the Touch-Control lever slowly several times to bleed air and prime the pump
- Listen for quiet operation (no whining or cavitation sounds)
- Raise an implement and verify it lifts smoothly and holds position without drifting
- Check all seal points for leaks
- Run the tractor under load for 15-20 minutes, allow it to reach operating temperature, and recheck performance
Rebuild vs. Replace: Making the Right Call
Not every pump is worth rebuilding. The cost of a rebuild kit and your labor time must be weighed against what a replacement pump costs and the risk of repeated failure.
Scenario 1 — Rebuild Makes Sense
Rebuild when seals and gaskets are the only failed components, gear clearances measure within spec, and the pump body shows no cracks or deep scoring.
In this condition, a seal kit (typically $30–60 in parts) fully restores performance. New seals eliminate internal and external leakage, bringing pressure and flow back to spec without replacing the entire pump.
Scenario 2 — Replace Instead of Rebuild
Replace when any of these conditions exist:
- Gear clearances exceed 0.005"
- Housing bore is scored
- End cover is warped beyond lapping flat
- Thrust plates show erosion paths
Reassembling a worn pump with new seals will not recover pressure. You'll spend money on parts and hours of labor only to end up with the same weak performance. A replacement pump — new, rebuilt, or good used — delivers reliable results from day one.
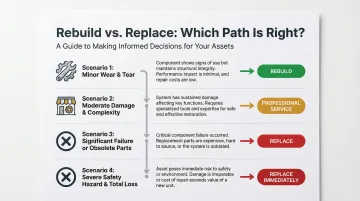
Scenario 3 — Professional Rebuild Service
Consider professional service when pump internals show borderline wear — clearances near but not over limits, minor scoring — or when you don't have the measuring tools for precision hydraulic work.
A shop like Hydrostatic Pump Repair can measure clearances accurately, machine worn surfaces where feasible, and source hard-to-find Farmall Cub components. Their work comes with a warranty, which removes the financial risk if a DIY rebuild wouldn't have held.
Scenario 4 — Replace Immediately (Do Not Rebuild)
Replace immediately — without attempting a rebuild — if the pump shaft is seized, the housing is cracked, or a previous failed rebuild has scored the internal bores.
Running a seized or cracked pump pushes metal debris through the entire system. Once those particles reach the control valve, cylinder, and lines, you're no longer looking at a pump replacement. You're looking at a complete system overhaul.
Mistakes to Avoid and Long-Term Maintenance Tips
A clean rebuild done right can still fail early if you cut corners on fluid, measurements, or cleanliness. These are the three mistakes that send rebuilt pumps back to the bench.
Contamination: The Most Common Rebuild Killer
Particle contamination causes 70-80% of hydraulic system failures. Even microscopic debris introduced during the rebuild will score new gears and seals within hours of operation. Wipe down every surface, use clean lint-free rags, and keep the work area clear of grinding dust or metal shavings before you open the pump housing.
Skipping Clearance Measurements
Reinstalling gears without checking clearances means you have no way to know if the rebuild will hold pressure. A feeler gauge takes two minutes to use. Skipping it risks the entire job — you'll find out the clearances were off when the pump fails again under load.
Wrong Fluid or Mixed Fluid Types
The Farmall Cub Touch-Control system requires IH Touch-Control Fluid, or its modern equivalent, Case IH Hy-Tran. Using detergent motor oils causes foaming, seal swelling, and accelerated wear. Never mix fluid types — and always confirm the specified fluid in your operator's manual before filling.
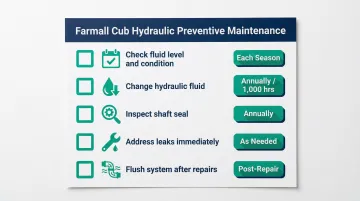
Preventive Maintenance Tips
- Check fluid level and condition at the start of each season
- Change hydraulic fluid at least once per year or before 1,000 hours of operation (per the 1952 Farmall Cub Operator's Manual)
- Inspect the pump shaft seal annually for seepage or wetness
- Address small leaks immediately before they become low-fluid events that cause cavitation damage
- Flush the system after any major component repair to clear any debris introduced during the work
Frequently Asked Questions
What kind of hydraulic fluid does a Farmall Cub take?
The Farmall Cub Touch-Control system requires IH Touch-Control Fluid, which has been superseded by Case IH Hy-Tran or equivalent hydraulic transmission fluids. Do not use detergent motor oils, as they lack anti-foaming agents and will cause aeration and rapid wear.
What happens if you spin a hydraulic pump backwards?
Running a gear pump in reverse reverses inlet and outlet flow, causing immediate seal failure and potentially pushing debris into the system or causing cavitation. Always confirm drive gear orientation before reinstalling the pump to avoid pump failure and system contamination.
How do I know if my Farmall Cub hydraulic pump needs rebuilding or full replacement?
Measure gear-to-housing clearances with feeler gauges. If clearances are within service specification (under 0.005"), a seal kit rebuild is appropriate. If clearances are excessive or the housing is scored, replacement is the better path.
Where can I find a rebuild kit for a Farmall Cub hydraulic pump?
Rebuild kits for vintage Farmall Cub pumps are not available at typical auto parts stores. Specialist suppliers like Steiner Tractor Parts and Burch Store Tractors carry hard-to-find vintage IH components. If you'd rather skip the parts hunt, Hydrostatic Pump Repair offers professional rebuild services as an alternative.
Can I rebuild the Farmall Cub hydraulic pump myself without special tools?
Basic hand tools, a torque wrench, and feeler gauges cover most rebuilds — but a service manual is essential and clearance measurements cannot be skipped. Without measuring tools or relevant experience, a professional rebuild service is the safer option.