Introduction
HARDI sprayer pumps are the core driver of agricultural spray systems, maintaining pressure, flow rate, and chemical application consistency across the boom. When a pump fails, the entire operation comes to a halt—often mid-season, when downtime costs the most.
Pump problems are among the most common reasons sprayers underperform or fail outright. Most failures follow recognizable patterns:
- Worn or cracked diaphragms
- Defective pump valves
- Air leaks on the suction side
- Clogged filters restricting flow
Most of these issues can be diagnosed and resolved without replacing the entire pump.
This guide covers the most common HARDI pump problems, their root causes, step-by-step repair procedures, and guidance on when to fix versus replace. Whether you're troubleshooting a loss of pressure or deciding between a rebuild kit and a new pump, this resource will help you make the right call.
Key Takeaways
- HARDI pumps fail most often due to worn diaphragms, failed valves, air leaks on the suction side, or clogged filters
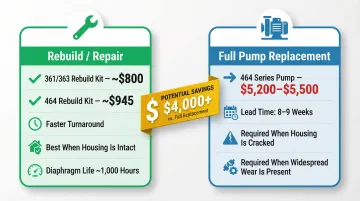
- Most repairs use rebuild kits costing $800–$950, compared to $5,200+ for a full pump replacement
- Diagnose the root cause before starting repairs—fixing symptoms alone leads to repeat failures
- Swap the pump only when the housing is cracked, failures keep recurring, or the unit has outlived its service life
What Is a HARDI Sprayer Pump?
HARDI sprayers primarily use diaphragm pumps — positive displacement pumps designed to keep liquid completely separated from the bearings, crankshaft, and other mechanical parts. This separation lets the pump self-prime and run dry without damage, which matters in field conditions where prime loss is common.
The most common models are the 363, 364, 463, and 464 series — high-capacity, six-diaphragm radial pumps. Reciprocating diaphragms and check valves work together to draw liquid from the tank and push it under pressure to the boom and nozzles.
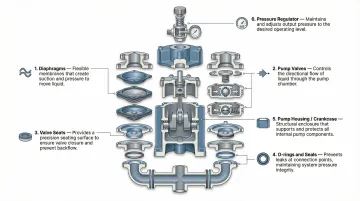
Understanding how these pumps are built helps pinpoint where failures start. Key components include:
- Diaphragms — polyurethane or nitrile membranes that flex to create suction and pressure
- Pump valves — inlet and outlet check valves that control unidirectional flow
- Valve seats — sealing surfaces that must close cleanly for proper pressure
- O-rings and seals — maintain airtight and watertight integrity across the housing
- Pump housing (crankcase) — cast iron dry sump enclosing the grease-lubricated crankshaft, connecting rods, and bearings
- Pressure regulator — dampens pressure spikes and holds consistent boom pressure
Chemical exposure and heavy seasonal use degrade all of these parts — and knowing which component failed determines whether you're looking at a quick diaphragm swap or a full pump rebuild.
Common Problems With HARDI Sprayer Pumps
Most HARDI pump failures trace back to one of four predictable patterns: pressure loss, priming failure, fluid leaks, or erratic pulsation. Identifying which pattern matches your symptoms points directly to the likely cause.
Loss of Operating Pressure
Symptoms:
- Reduced or no pressure at the boom
- Nozzles spraying below expected output
- Pressure gauge reading significantly lower than normal
Likely Causes:
- Plugged suction filter
- Air leak on the suction side (defective o-rings, pinhole in suction hose, cracked plastic fittings)
- Defective pump valves or valve seats
- Foreign material lodged in the pop-off valve
- Low fluid level in the tank
Pump Slow to Prime or Fails to Prime
The pump runs but either takes unusually long to pull fluid or never develops pressure after startup. This often shares root causes with pressure loss but points more specifically to the inlet side.
Likely Causes:
- Air leak on suction side (particularly at the pump inlet fitting)
- Suction filter plugged or suction tube jammed into the sump
- Defective o-ring in the Hardi-matic valve
- Foreign material lodged in pump valves
Fluid Leaking From the Pump
Symptoms:
- Fluid dripping from the bottom of the pump housing
- Leaking around the diaphragm covers
Likely Causes:
- Defective or ruptured diaphragms (bottom leak)
- Loose cover retaining bolts
- Defective valve o-rings
- Pinched diaphragm during reassembly
- Cracked diaphragm cover or main pump housing
Excessive Pressure Fluctuation or Pulsation
Erratic gauge readings and visibly pulsing hoses usually indicate a flow disruption rather than a total pressure failure — the pump is working, but inconsistently.
Symptoms:
- Pressure gauge jumping erratically
- Suction or pressure hoses pulsing visibly
- Inconsistent boom output across sections
Likely Causes:
- Restricted or plugged suction filter causing pump cavitation
- Air leak on suction side
- Self-cleaning filter cone stuck or containing fluid
- Plugged self-cleaning filter screen
- Defective pump valves causing irregular flow
How to Repair a HARDI Sprayer Pump (Step-by-Step)
Attempting repairs without first identifying the specific problem and confirming its root cause is the most common cause of repeat failures and unnecessary parts replacement. Follow this systematic approach.
Step 1: Identify the Exact Problem
Observe visible symptoms:
- Look for leaks at the pump body or diaphragm covers
- Listen for irregular pulsing or cavitation noise
- Note pressure gauge behavior (steady drop, fluctuation, zero pressure)
Document when the problem occurs:
- At startup, under load, after refill, or continuously
- Whether it developed gradually or suddenly
- This narrows the failure category quickly
Step 2: Confirm the Root Cause Before Touching the Pump
Inspect the suction side first:
- Check the suction filter for plugging
- Inspect all suction-side o-rings and hose connections for air leaks
- Verify the suction valve is fully open
- Ensure the suction tube is not jammed into the sump
Check the self-cleaning filter assembly:
- Verify the cone moves freely
- Ensure it is not retaining fluid
- Confirm the screen is clear
- A stuck or fluid-filled cone is a frequently overlooked cause of pressure problems
Rule out external factors:
- Low tank level
- Agitation valve in wrong position
- Chemical fill valve left open
Complete these checks before disassembling the pump.
Step 3: Repair Based on Confirmed Root Cause
The right repair depends entirely on what the diagnosis reveals — applying the wrong fix risks damaging components that are still working.
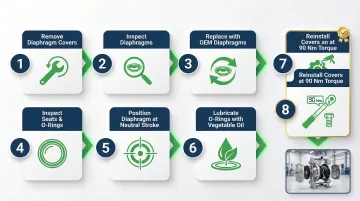
If the Diaphragms Are Defective
- Remove the diaphragm covers, noting bolt torque sequence to avoid pinching
- Inspect diaphragms for tears, pinholes, or deformation
- Replace with OEM-spec diaphragms
- Inspect the diaphragm seats and cover o-rings simultaneously
- Critical: Position each diaphragm between the center and top of its stroke (neutral or out) before tightening—if tightened in the negative position, the diaphragm edge will pinch and fail to seal
- Lubricate o-rings with vegetable oil (never petroleum-based products)
- Apply pump grease to the underside of the diaphragms
- Reinstall covers with even torque (90 Nm / 67 ft-lb) to prevent pinching
If the Pump Valves or Valve Seats Are Defective
- Access the valve assemblies per the pump model's service manual
- Note valve orientation (for 360/460 series, two white check valves must be placed at 10 and 2 o'clock positions on the suction side)
- Inspect inlet and outlet check valves for debris, deformation, or chemical degradation
- Clean or replace valve seats and balls as needed
- Never reuse old valves or o-rings—they will not create a proper seal
- Worn constant pressure seats cause pressure fluctuation between the manifold and boom gauges
If There Is an Air Leak on the Suction Side
Systematically test each suction-side connection point:
- O-ring at the suction filter
- Suction hose (check for pinholes by pressurizing)
- O-rings at main/flush tank valves
- O-ring at the pump suction fitting
Replace any compromised seals or fittings. Even a small air leak prevents the pump from developing full pressure.
If the Pump Housing or Covers Are Cracked
Inspect for hairline cracks in the main pump housing or diaphragm covers, which may only be visible when the pump is under pressure. Housing cracks generally cannot be reliably field-repaired and require component replacement. When in doubt, have the housing evaluated by a pump specialist before reassembly.
Step 4: Test and Validate the Repair
- Reassemble the pump
- Prime the system and run it at normal operating pressure
- Monitor the pressure gauge for stability
- Inspect all repair points for leaks under load
- Cycle the boom valves to confirm even pressure across sections
- Run the sprayer for at least one full tank before returning it to field operation
- Recheck torque on diaphragm cover bolts after the first pressurized run
Fix vs Replace: Making the Right Call on Your HARDI Pump
The fix-or-replace decision hinges on three factors: the nature of the failure, the age and overall condition of the pump, and the cost comparison between repair parts and a replacement pump.
Scenario 1: Worn or Ruptured Diaphragms
Fix: Diaphragm replacement is a routine repair with widely available rebuild kits. OEM rebuild kits for the 361/363 models cost approximately $800, while 464 rebuild kits run around $945. This is cost-effective and straightforward if the housing and covers are intact.
Replace: If diaphragms have failed repeatedly in a short period, inspect for underlying causes such as cavitation, chemical incompatibility, or over-pressurization before rebuilding again.
Scenario 2: Defective Pump Valves or Seats
Fix: Valve and seat replacement is economical and restores full pump performance when the housing is undamaged. Source OEM or equivalent-spec parts to ensure proper sealing.
Replace (or rebuild professionally): If valve failures are accompanied by abnormal pump noise or multiple simultaneous failures, have the full pump assembly inspected before investing in parts. If internal wear on the connecting rods, conrod rings, or bearings is present (usually due to poor greasing), a simple top-end rebuild will fail.
Scenario 3: Cracked Pump Housing or Front Cover
Replace the affected component: Hairline cracks in the pump housing or diaphragm covers cannot be reliably field-repaired and will worsen under pressure. Research current replacement part pricing versus a full pump replacement to determine the most economical path.
Scenario 4: Pump Has Exceeded Service Life or Sustained Widespread Wear
Replace: If the pump has accumulated years of heavy-season use, requires simultaneous replacement of multiple core components, or repeatedly fails despite correct maintenance, full replacement is the more cost-efficient decision long-term.
For pumps with borderline wear — where housing is intact but multiple internal components are degraded — a professional rebuild is worth evaluating before committing to a full replacement. We rebuild HARDI-compatible hydrostatic pumps to OEM specifications, which can extend pump life at a lower cost than sourcing a new unit. Call us at 800-361-0028 to discuss your equipment.
Keep these reference points in mind when weighing your options:
- Diaphragms last around 1,000 hours under normal use; inspect every 200–500 hours or at season's end
- Replacement pumps for the 464 series range from $5,200 to $5,500 with lead times of 8–9 weeks
- Rebuild kits are the faster, lower-cost path when the housing is intact
Preventive Maintenance and Common Mistakes to Avoid
Most HARDI pump failures are preventable, tracing back to deferred maintenance, improper flushing after chemical use, or ignored filter and seal wear.
Key Preventive Practices
Filter and flushing:
- Inspect and clean the suction filter every 10 hours of operation during heavy use
- A partially plugged suction filter is the leading cause of pressure loss and pump cavitation
- Flush the entire pump and chemical pathway with clean water after every use, particularly after applying corrosive or crystallizing chemicals
Lubrication:
- Grease the pump every 50 hours of normal operation with 30 grams (1 oz) of lithium-based grease (NLGI grade 2) into each lubrication point
- Stop the pump during greasing
- After disassembling the pump for a diaphragm renewal, re-lubricate with 200 grams (7 oz) of grease into each lubrication point
Seal and connection inspection:
- Inspect all suction-side o-rings, hose connections, and fittings annually
- Replace worn components before they fail; air leaks are silent until they cause visible pump performance issues
Common Mistakes to Avoid
- Replacing diaphragms without checking valve seats: Valves and diaphragms wear together. Swapping only the diaphragms on a pump with worn seats won't fully restore pressure.
- Skipping a pressurized test run after reassembly: A repair that looks correct at rest can leak or fail under operating pressure. Testing before field deployment prevents mid-season breakdowns.
- Using petroleum-based lubricants on seals: HARDI explicitly warns against petroleum-based products on o-rings and seals. Use vegetable oil instead.
Frequently Asked Questions
How much does it cost to repair a HARDI sprayer pump?
Repair costs vary based on which components need replacement. OEM diaphragm rebuild kits for the 361/363 series cost approximately $800, while 464 rebuild kits run around $945. Professional rebuild services or housing replacements are higher but still more economical than full replacement pumps, which cost $5,200 to $5,500.
Can a HARDI sprayer pump be repaired or rebuilt?
Yes — diaphragms, valves, seats, and o-rings are all replaceable components. Full rebuilds are a cost-effective alternative to replacement, provided the pump housing is intact and the bearings and crankshaft are undamaged.
How can I tell if my HARDI sprayer diaphragm pump is bad?
Watch for fluid leaking from the pump bottom (ruptured diaphragm), persistent pressure loss despite a clean suction filter, excessive hose pulsation, or inability to prime. Any of these symptoms means internal components need repair.
Is it worth rebuilding a HARDI sprayer pump or should I replace it?
Rebuilding makes sense when failure is limited to diaphragms, valves, or seals — replacement is warranted when the housing is cracked or multiple core components have failed at once. With rebuild kits under $1,000 versus $5,200+ for a replacement pump, the math usually favors rebuilding.
What is the life expectancy of a HARDI sprayer pump?
Sprayer diaphragms typically last around 1,000 hours under normal use, but should be inspected for wear every 200 to 500 hours or at season's end. HARDI backs pump castings with a 5-year warranty (excluding wear parts), provided the system is flushed with fresh water daily.