Introduction
When a hydraulic motor fails on an excavator, conveyor, or winch, operations stop. The motor that converts hydraulic pressure into mechanical torque is usually the last thing anyone thinks about — until it isn't working. At that point, every hour of downtime carries a real cost.
Most hydraulic motors degrade gradually due to contamination, seal wear, cavitation, and overloading. Between 70% and 80% of all hydraulic motor failures trace back to fluid contamination alone. Catching these symptoms early makes the difference between a cost-effective rebuild and a costly full replacement.
This guide covers the signs a rebuild is needed, the full rebuild process, when rebuilding makes financial sense over replacement, and the mistakes that cause repeat failures.
Key Takeaways
- Rebuilding a hydraulic motor covers disassembly, inspection, seal and bearing replacement, and torque-spec reassembly
- Watch for these failure signals: external leaks, torque or speed loss, abnormal noise, overheating, and fluid contamination
- Apply the 50% rule — rebuild only when core components are sound and repair costs fall below half the replacement price
- Obsolete motors or complex internal failures often call for professional rebuild support and specialized parts sourcing
What Is a Hydraulic Motor — and When Does It Need a Rebuild?
A hydraulic motor is a positive-displacement device that converts hydraulic pressure and flow into mechanical torque and rotation. Unlike hydraulic pumps, which convert mechanical energy into hydraulic energy, motors do the reverse, powering equipment like excavators, conveyors, winches, and mobile machinery.
Knowing when that motor needs a full rebuild — not just a spot fix — starts with understanding the difference between the two.
Repair vs. Rebuild:
- Repair: Fixes a single fault — a leaking seal, a worn bearing, one failed component
- Rebuild: Comprehensive disassembly, inspection, and restoration of all wear-prone components to near-original condition
A rebuild becomes necessary when a motor shows multiple simultaneous failure symptoms, has logged significant operating hours, or when repeated spot repairs no longer hold. Done correctly, a rebuild restores 80–90% of the motor's original service life — and the right approach depends heavily on which type of motor you're working with.
Common Hydraulic Motor Types:
| Motor Type | Key Characteristics | Typical Applications |
|---|---|---|
| Gear/Geroler | Compact, cost-effective, high power-to-weight ratio | Agricultural augers, sweepers, conveyors, winches |
| Vane | Low noise, low torque ripple, efficient | Industrial mixers, shredders, compressor drives |
| Piston (Axial/Radial) | Highest efficiency, high pressure capability | Heavy-duty mobile equipment, excavators, wheel drives |
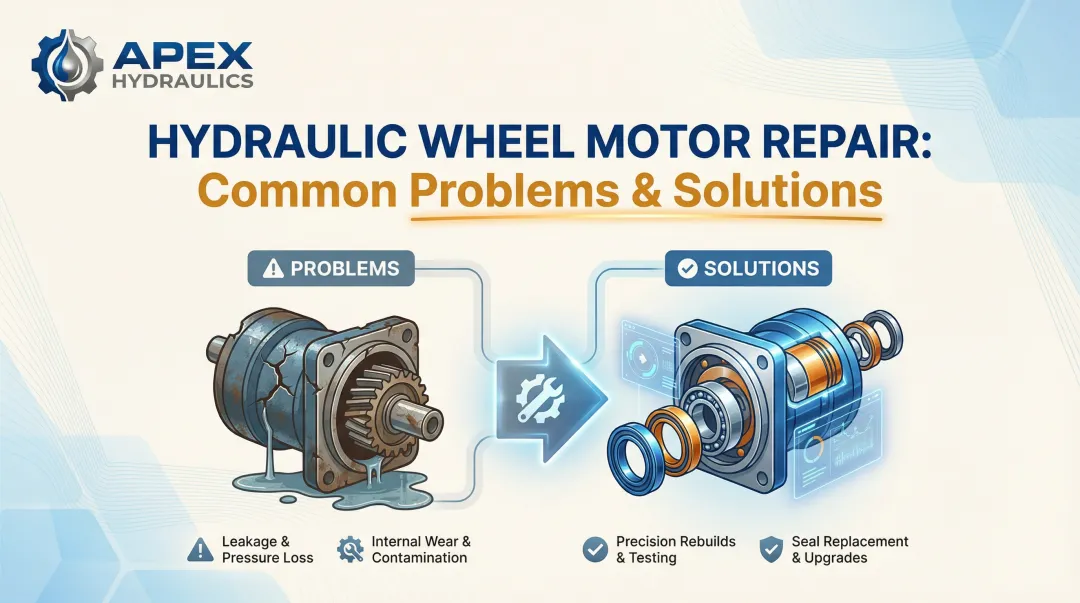
Signs Your Hydraulic Motor Needs a Rebuild
Most hydraulic motor failures give observable warnings before becoming catastrophic. Catching these patterns early is what keeps a rebuild viable — miss them, and you're looking at full replacement instead.
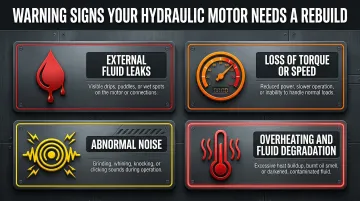
Here are the four most common warning signs:
- External fluid leaks — oil pooling at shaft seals or end caps
- Loss of torque or output speed — sluggish movement, stalling under load
- Abnormal noise — knocking, whining, or grinding at startup or speed
- Overheating and fluid degradation — hot casing, dark or burnt-smelling fluid
External Fluid Leaks
Symptom: Oil visible on motor housing, pooling at shaft seals or end caps
Likely Cause: Worn or hardened shaft seals, O-ring degradation, or loose end cap bolts. External leaks are often the first sign of broader internal wear.
Loss of Torque or Output Speed
If equipment moves sluggishly, stalls under normal load, or fails to reach rated speed, internal bypass is the likely culprit. Worn pistons, vanes, or gear surfaces allow fluid to recirculate internally rather than drive the output shaft. High case drain flow confirms the diagnosis.
Abnormal Noise (Knocking, Whining, or Grinding)
Symptom: Rhythmic knocking at startup or under load; high-pitched whining at speed
Likely Cause:
- Cavitation from low inlet pressure or fluid starvation (sounds like marbles in a can)
- Bearing wear from contaminated or degraded fluid
- Vapor bubble collapse causes pitting and erosion on valve plates and cam rings
Overheating and Fluid Degradation
A motor casing that's hot to the touch — paired with fluid that's dark, cloudy, or smells burnt — points to excessive internal bypass. The bypassing fluid generates heat instead of work, and contaminated fluid accelerates wear on every mating surface. At this stage, a full flush and component inspection can't wait.
How to Rebuild a Hydraulic Motor: Step-by-Step
A successful rebuild hinges on cleanliness, accurate measurement, and correct parts. Rushing any step risks reintroducing the original failure.
Step 1: Prepare Your Workspace and Gather Tools
Required Tools:
- Torque wrench
- Snap ring pliers
- Bearing puller
- Seal driver set
- Feeler gauges or micrometer
- Lint-free cleaning cloths
- Parts tray or numbered containers
A clean, flat work surface is non-negotiable. Contamination introduced during the rebuild is a leading cause of premature failure. Organize components by disassembly order to avoid reassembly errors.
Step 2: Drain, Depressurize, and Disassemble
Safety First:
- Relieve all system pressure before disconnecting lines
- Drain all fluid and label ports for correct reinstallation
- Remove the motor from the system
Disassembly Sequence:
- Remove end cap bolts
- Lift end cover
- Extract the rotating group (pistons/vanes/gears depending on motor type)
- Remove shaft seal and bearings
Pro Tip: Photograph or diagram the assembly sequence as you go. This prevents costly reassembly mistakes.
Step 3: Clean, Inspect, and Measure Components
Cleaning:
- Thoroughly clean all metal components with appropriate solvent
- Remove all traces of old fluid, debris, and contamination
Visual Inspection:
Start with a thorough visual pass before reaching for measuring tools. Look for:
- Scoring, pitting, or galling on gerotor sets, valve plates, and shafts
- Heat discoloration (blue or straw color)
- Corrosion on housing bore, shaft, or end plates
When to Replace vs. Reuse:
- Replace: Any component showing scoring, pitting, heat discoloration, or corrosion
- Reuse: Only components that are visually clean and dimensionally within tolerance
Measurement:
For piston motors, typical clearances are:
- Piston bores: 5 to 40 µm
- Valve plate cylinders: 1.5 to 10 µm
Particles larger than 1/3 of these clearance widths cause blockages and grooving. Use a micrometer or dial bore gauge to measure clearances. Components outside tolerance must be replaced.
Standard Rebuild Kit Contents:
| Kit Type | Typical Contents | Motor Type Focus |
|---|---|---|
| Minor/Seal Kit | O-rings, shaft seals, backup rings, face seals (Buna-N or Viton) | Universal (Gear, Vane, Piston) |
| Bearing Kit | Tapered roller bearings, needle thrust bearings, spacers, retaining rings | Universal (Gear, Vane, Piston) |
| Major Overhaul Kit | Cylinder barrels, piston assemblies, valve plates, gerotor sets, vane cartridges | Specific to Piston, Vane, or Geroler motors |
Step 4: Replace Worn Components and Reassemble
Installing Seals:
- Use a seal driver — never use sharp tools that can nick the sealing lip
- Lightly lubricate seals with clean hydraulic fluid before installation
- Avoid heavy grease internally as it can block small passages
Reassembly:
- Reassemble the rotating group in reverse disassembly order
- Follow manufacturer torque specifications for end cap bolts
- Use a criss-cross (star) tightening pattern to prevent housing distortion
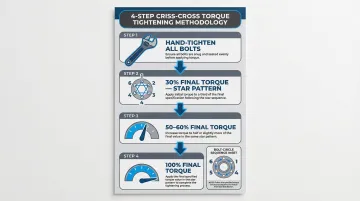
Torque Methodology:
OEMs mandate multi-step, criss-cross tightening:
- Snug all bolts hand-tight
- Tighten to 30% of final torque in star pattern
- Tighten to 50–60% of final torque
- Tighten to 100% of final torque
Torque values assume dry threads unless specified otherwise. Lubricated threads require less torque to achieve the same clamping force — check your service manual if thread condition differs.
Parts Sourcing for Legacy Motors:
For motors from less common or legacy manufacturers, sourcing the correct OEM-spec seal kit and internal components is often the hardest part of the job. Hydrostatic Pump Repair maintains a parts database covering thousands of manufacturers specifically to solve this problem — avoiding incompatible substitutions that can cause a second failure.
Step 5: Test and Validate the Rebuild
Pre-Installation Check:
- Manually rotate the output shaft to confirm smooth rotation
- Check for binding or grinding
Post-Installation Validation:
- Run the motor at low pressure with no load first
- Gradually increase to operating pressure
- Monitor for leaks, unusual noise, and temperature stability
- Confirm output torque and speed match pre-failure benchmarks
Documentation:
- Record rebuild date
- List components replaced
- Note operating hours at time of rebuild
Good records turn a one-time rebuild into a predictive maintenance baseline — you'll know exactly when to expect the next interval and catch failure patterns before they cause unplanned downtime.
When to Rebuild vs. Replace Your Hydraulic Motor
The decision comes down to four variables: extent of damage, motor age, parts availability, and cost ratio.
Rebuild When Damage Is Limited to Seals, Bearings, and Soft Components
If the housing bore, shaft, and core rotating group are dimensionally within tolerance, a seal and bearing rebuild restores full function at a fraction of replacement cost.
Skip the rebuild if the housing is cracked, the bore is scored beyond honing tolerance, or the shaft is bent or fractured — those are replacement conditions.
Rebuild When the Motor Is Within Its Service Life and Parts Are Available
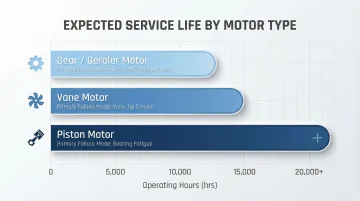
Typical Service Life (Operating Hours):
| Motor Type | Expected Service Life | Primary Failure Modes |
|---|---|---|
| Gear/Geroler | 5,000 – 10,000 hours (up to 15,000 in clean systems) | Housing and bearing wear, seal degradation |
| Vane | 10,000 – 15,000 hours | Vane tip wear, cam ring scoring |
| Piston | 15,000 – 20,000+ hours | Bearing fatigue |
Motors that haven't reached their rated service hours are strong rebuild candidates — especially when symptoms are caught early, before wear propagates to the rotating group.
If the motor is discontinued or obsolete with no seal kits available, or if sourcing lead times would cause unacceptable downtime, a replacement or remanufactured unit is the more practical path.
Rebuild When Repair Cost Is Below the Replacement Threshold
The 50% Rule:
If rebuild costs exceed 50% of a new unit's price, replacement is the better long-term call.
Rebuild Cost Ranges:
- Minor repairs (seals, gaskets): $300 to $800
- Moderate repairs (bearings, cleaning): $800 to $1,500
- Extensive overhauls (pistons, shafts, gerotor sets): $2,000+
When total rebuild cost stays below the 50% threshold, rebuilding makes financial sense. If the repair history shows repeated failures within short intervals, that pattern signals wear a rebuild won't fix — replacement is the right move.
Consider Operational Criticality
If the motor can be pulled and rebuilt offline while a spare keeps production running, a rebuild is low-risk. In a critical single-path system with no redundancy, the calculus shifts: if a reman or new unit is immediately available and downtime is unacceptable, replacement wins on speed alone.
Common Rebuild Mistakes to Avoid and Preventive Maintenance After the Rebuild
Mistakes to Avoid
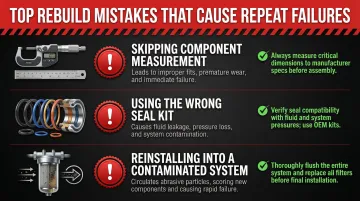
Three mistakes account for the majority of repeat failures after a rebuild:
- Skip component measurement — Parts that look fine can still be out of tolerance. Measure every critical component before reassembly; visual inspection alone is not sufficient.
- Use the wrong seal kit — Seals of the incorrect material or lip profile for your fluid type and pressure rating will fail early. Match the kit to the exact motor model and fluid specification.
- Reinstall into a contaminated system — A rebuilt motor dropped into dirty hydraulic lines will fail just as fast as the original. Flush lines, replace filters, and verify fluid cleanliness before startup.
Avoiding those mistakes gets the rebuild right. Keeping the motor running long-term takes consistent maintenance.
Preventive Maintenance After the Rebuild
Set a scheduled inspection interval based on operating hours and application severity. Check for early-stage leaks, monitor fluid condition, and replace filters per manufacturer recommendations.
Fluid and Filter Change Intervals:
- Initial break-in: First fluid change at 500 operating hours to remove assembly dirt and break-in wear particles
- Sealed reservoirs: Every 2,000 hours
- Breather-equipped reservoirs: Every 500 to 1,000 hours, or based on oil analysis
Keep a rebuild log documenting the date, components replaced, and operating hours at time of rebuild. If failures start repeating, that log will tell you whether you're dealing with overloading, a contamination source, or a misapplication problem.
Fluid cleanliness is the single highest-leverage maintenance variable. Holding hydraulic fluid at ISO 15/12 or better can extend motor life by 30% to 50% beyond standard ratings — often with no hardware changes required.
Frequently Asked Questions
Can you rebuild a hydraulic motor?
Yes — as long as the housing and core structural components are intact, most hydraulic motors can be rebuilt. Gear, vane, and piston motors are all rebuildable, though complexity varies by type. Piston motors require more extensive disassembly and measurement; gear motors are considerably simpler.
How much does it cost to rebuild a hydraulic motor?
Costs depend on motor size, type, and wear extent. Seal and gasket repairs run $300–$800; bearing work runs $800–$1,500; full overhauls (pistons, shafts, gerotor sets) can exceed $2,000. New units typically cost $4,000–$10,000+, making rebuilding a strong value in most cases.
What is the life expectancy of a hydraulic motor?
Under normal operating conditions, gear motors last 5,000–10,000 hours, vane motors last 10,000–15,000 hours, and piston motors can exceed 15,000–20,000 hours. A quality rebuild can restore 80–90% of original service life.
What parts are typically replaced during a hydraulic motor rebuild?
Shaft seals, O-rings, gaskets, and bearings are standard in all rebuilds. Piston motors may also require valve plate, slipper pad, or cylinder barrel replacement based on inspection findings. Gear and vane motors may need gerotor sets or vane cartridges replaced.
What tools do you need to rebuild a hydraulic motor?
Core tools include a torque wrench, snap ring pliers, bearing puller, seal driver set, micrometer or bore gauge, and a clean work surface with component organization trays. Lint-free cleaning cloths and appropriate solvent are also essential.
How long does a hydraulic motor rebuild take?
A seal and bearing rebuild typically takes 2–4 hours for an experienced technician. A full piston motor overhaul with component machining runs 1–3 days. Parts availability is usually the biggest variable — sourcing uncommon components can extend total turnaround significantly.