Introduction
A failed piston pump means downtime, and downtime costs money. The instinct is to replace it outright—but rebuilding, when done correctly, saves 40-70% compared to buying new. The catch? A piston pump rebuild isn't a simple seal swap. It requires:
- Full disassembly and component-level inspection
- Precision measurement down to micron tolerances
- Strict contamination control throughout reassembly
- OEM torque sequences followed without improvisation
This guide covers the complete rebuild process: what to prepare, the variables that determine outcome quality, and the mistakes that turn a fixable pump into scrap.
Most failed rebuilds trace back to the same root causes — skipped diagnostics, reused components that looked acceptable but weren't, and guessed torque values. Whether you're doing this in-house or evaluating a professional service, understanding these fundamentals is what separates a pump that performs through its next full service interval from one that fails at startup.
Key Takeaways
- A proper rebuild means full disassembly, precision measurement, and verified reassembly — seal swaps alone rarely fix the root cause
- Diagnose the failure mode before opening the pump; skipping this step wastes time and money
- Key specs to verify: piston-to-bore clearance (microns), swash plate angle, ISO 4406 fluid cleanliness, and OEM torque sequences
- Most failures stem from skipping diagnostics, reusing worn seals or bearings, or contaminating parts during reassembly
- Replace the pump if the cylinder barrel shows deep scoring, out-of-spec bore diameter, or cracked housing
How to Rebuild Your Piston Pump Step by Step
Step 1: Diagnose the Failure Before You Disassemble
Start by measuring actual performance against rated specifications. Check pressure output, flow rate, and operating temperature—record the numbers. A new axial piston pump typically runs at 95% volumetric efficiency; as internal wear increases, efficiency drops and internal leakage rises.
Look for external clues before opening anything:
- Oil leaks around seals or housing joints
- Unusual noise — whining suggests cavitation; knocking indicates bearing failure
- Overheating beyond normal operating range
- Fluid contamination — metallic particles or discoloration in the hydraulic oil
Evaluate case drain flow at rated viscosity and temperature. Excessive drain flow (for example, over 18 L/min at 350 bar for heavy-duty pumps) signals internal bypassing from worn piston-to-bore clearances. These diagnostic signals tell you which components to prioritize during inspection, and whether a rebuild is even worth attempting.
Step 2: Safely Isolate and Disassemble the Pump
Depressurize the hydraulic system completely. Lock out and tag out the power source. Drain all residual fluid before removing the pump from the system.
Note port orientation and line connections (photographs help) before disconnecting anything.
Work on a clean, lint-free surface using non-marring tools. Mark or photograph the position and orientation of every component as you remove it:
- Valve plate alignment
- Piston numbering and cylinder bore positions
- Retainer plate bolt sequence
Organize parts by subassembly group as you go:
- Rotating group (pistons, shoes, cylinder barrel)
- Valve plate assembly
- Shaft and bearing group
This organization prevents confusion during reassembly and ensures nothing gets installed backward or in the wrong position.
Step 3: Inspect and Measure Every Component
Use a micrometer to measure piston diameter against OEM wear limits. Replace any piston that is out of round or shows deep scoring. No exceptions.
Cylinder barrel:
- Measure bore diameter at multiple points (top, middle, bottom)
- Check for surface finish degradation
- If bore diameter varies by more than 0.0102 mm (0.0004 in), the barrel is scrap
Valve plate and swash plate:
- Check flatness using a surface plate or feeler gauge
- Valve plate parallelism must be ≤ 0.025 mm
- Look for corrosion, erosion marks, or cavitation pitting
- Light scratches can be lapped; deep grooves require replacement
Bearings and seals:
- Inspect bearings for rough rotation, pitting, axial play
- Replace all seals and O-rings regardless of visual condition — rubber seals compress and take a set over time
Step 4: Source and Install Replacement Parts
Replace every component outside OEM wear tolerances. At minimum, install:
- Complete seal kit
- New O-rings
- Any bearing showing abnormal play
Use OEM-spec or OEM-compatible parts. Aftermarket parts that don't meet pressure ratings or dimensional tolerances will cause premature failure.
Finding components for older or less common pump brands can delay rebuilds by weeks. Hydrostatic Pump Repair sources parts across thousands of manufacturers, including hard-to-find brands like Cessna, Uchida, and older Sundstrand models. Call 800-360-0028 if you're stuck sourcing components.
Step 5: Reassemble, Prime, and Pressure-Test
Reassemble in reverse disassembly order. Apply clean hydraulic oil to all internal mating surfaces and bores before installation — this prevents dry starts and initial scoring.
Reassembly checklist:
- Use a calibrated torque wrench for all fasteners
- Follow OEM torque sequences exactly — uneven clamping causes leaks
- Tighten housing bolts in a cross pattern to prevent valve plate cocking
Before startup:
- Prime the pump with clean hydraulic fluid
- Bleed all air from the system
- Run a staged pressure test — start at low pressure and step up incrementally
- Monitor flow, temperature, and leakage at connections
- Do not return to full operating load until all parameters are stable
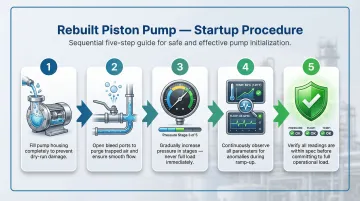
A pump that passes staged pressure testing under load is ready for service. If any parameter drifts outside spec during the test, identify the source before running at full pressure — catching a reassembly issue now costs far less than a second teardown.
What You Need Before Starting a Piston Pump Rebuild
Preparation quality directly determines rebuild efficiency. Technicians who stage everything before disassembly typically cut rebuild time by 30–50% compared to those who stop mid-process to track down a missing tool or part. The sections below cover what you need across two categories: tools and replacement components.
Equipment and Tools
Essential tools:
- Calibrated torque wrench (to OEM specs)
- Snap ring pliers
- Micrometer and bore gauge set
- Feeler gauges
- Surface plate for flatness checks
- Non-marring mallets
- Clean, lint-free rags
- Dedicated clean workbench
- Hydraulic test bench or portable pressure/flow test kit (required for post-rebuild load testing and flow verification)
With your tools staged, turn to replacement parts. Sourcing these before disassembly prevents delays once internal components are exposed.
Parts, Materials, and Fluid
- Model-specific seal kit and O-ring set
- Replacement bearings (if the diagnostic indicated wear)
- Valve plate (if the inspection showed damage)
- Piston/shoe assemblies (if measurements were out of spec)
Fluid requirements:
- Use only hydraulic fluid matching OEM-specified viscosity grade
- Flushing with contaminated or mismatched fluid causes premature seal failure and accelerates wear on freshly machined internal surfaces
Key Parameters That Affect Your Rebuild Results
Even a mechanically correct rebuild can underperform or fail prematurely if critical control variables are set or measured incorrectly. These are the parameters technicians most often overlook.
Clearance Tolerances and Wear Limits
Piston-to-bore clearance controls internal volumetric efficiency. Worn clearance exceeding OEM spec causes bypass leakage that reduces pressure output even in a freshly rebuilt pump.
| Pump Model | Piston-to-Bore Clearance | Max Shoe End Play |
|---|---|---|
| Parker P1/PD (060/075) | Variance max 0.0102 mm | 0.10 mm |
| Parker P1/PD (100/140) | Variance max 0.0102 mm | 0.13 mm |
| Kawasaki K3V/K5V | 0.028–0.043 mm | N/A |
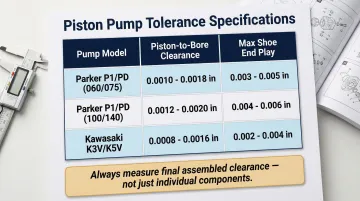
Components that are individually within tolerance can still produce out-of-spec clearance when assembled together. Always measure the final assembled clearance, not just individual parts.
Swash Plate Angle and Displacement Setting
In variable-displacement axial piston pumps, swash plate angle directly determines output flow. Incorrect setting after reassembly means the system will be over- or under-pressured regardless of internal component condition.
For reference, on Danfoss Series 45 pumps, adjusting the Pressure Compensator screw yields approximately 35 bar per turn; the Load Sense screw yields about 12 bar per turn. Small errors compound quickly.
Use OEM calibration specs and a dial indicator to set swash plate angle. This step is frequently skipped or approximated — and it's one of the more common causes of poor post-rebuild performance.
Hydraulic Fluid Cleanliness and Contamination Control
Contamination is responsible for up to 80% of hydraulic component failures. Even microscopic particles introduced during reassembly will score newly installed precision surfaces within hours of operation. ISO 4406 target cleanliness codes:
- For pumps under 3,000 psi: ISO code 17/15/13
- For pumps over 3,000 psi: ISO code 16/14/12
- Improving cleanliness by one code level can double component life
Assembly cleaning protocol:
- Rinse all components with clean filtered hydraulic fluid before assembly—not solvent, which leaves residue
- Use only lint-free cloths
- Work in a contamination-controlled area
Fastener Torque and Sequence
Piston pump housings and end caps require specific torque sequences to achieve uniform sealing across valve plate mating surfaces. Uneven torque creates micro-gaps that cause leakage under pressure. Reference torque values:
- Danfoss T90 075-100 end caps: 298 N·m (220 lbf·ft)
- Parker P1/PD housing bolts: 70-278 N·m depending on size
Always tighten in a cross pattern (star pattern) to prevent housing distortion. Improvising torque values is one of the most common causes of post-rebuild failure in the field.
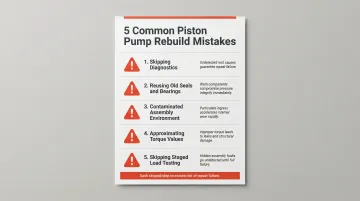
Common Mistakes When Rebuilding a Piston Pump
Even experienced technicians fall into the same traps. Avoiding these five mistakes is the difference between a rebuild that holds and one that fails again within weeks.
- Skip the diagnostic phase and you'll replace the wrong parts, miss the root cause, and face repeat failure.
- Replace all seals, O-rings, and bearings — even ones that look fine. Rubber takes a compression set over time and will fail under pressure.
- Keep the assembly environment clean. Shop rags that shed fibers, solvent residue, or airborne grit accelerate wear on precision-lapped surfaces.
- Never approximate torque specs, especially on valve plate retaining bolts and end cap fasteners. Use a calibrated torque wrench and follow the OEM sequence.
- Run a staged load test before returning the pump to full-duty operation. Skipping incremental pressure testing means problems won't surface until they cause a system failure.
When to Rebuild vs. When to Replace Your Piston Pump
Not every piston pump warrants a rebuild. The right call depends on the extent of damage, parts availability, and how many times the unit has already been through the shop. Replace instead of rebuild when:
- Cylinder barrel shows deep scoring or out-of-round bore beyond what a replacement barrel can address
- Housing is cracked or damaged
- Pump has already been rebuilt multiple times with diminishing service intervals
When rebuilding makes sense:
- Pump is from a manufacturer with limited replacement availability
- System is designed around a specific displacement or mounting configuration
- Failure is isolated to wear components (seals, bearings, valve plate) with housing and barrel still within spec
Professional rebuilds typically cost 40-70% less than new units. For a variable displacement piston pump, expect $1,800-$3,800 for a rebuild versus $3,200-$7,500 for new.
When to call a professional: If the rebuild scope exceeds in-house capability—such as when specialty calibration equipment is required or parts are unavailable through normal channels—Hydrostatic Pump Repair specializes in exactly these situations, covering a wide range of manufacturers including hard-to-source brands. Call 800-360-0028 to discuss your unit.
Conclusion
Rebuilding a piston pump efficiently comes down to disciplined preparation, precision measurement, and strict contamination control. The process rewards those who follow OEM specifications and penalizes those who improvise.
Most post-rebuild failures trace back to inadequate diagnosis before disassembly or skipping verification steps after reassembly—both are avoidable with the right approach. If the rebuild is within your shop's capabilities, a disciplined process will get you there. When it isn't — or when a pump comes back with recurring issues — working with a specialist like Hydrostatic Pump Repair ensures the unit is restored to OEM spec with the tooling, parts access, and diagnostic experience the job demands.
Frequently Asked Questions
How hard is it to rebuild a hydraulic pump?
A piston pump rebuild requires mechanical aptitude, precision measurement tools (micrometers, bore gauges, torque wrenches), and strict cleanliness practices. It's significantly more complex than replacing external seals — approach it with the OEM service manual in hand and prior hydraulic experience.
Can piston (hydraulic/hydrostatic) pumps and motors be rebuilt?
Yes, most piston pumps and motors can be rebuilt as long as the housing and cylinder barrel are within spec. Worn pistons, valve plates, bearings, and seals are all serviceable replacement items, making rebuilding a cost-effective alternative to full replacement in many cases.
What is the typical life expectancy of a piston (hydraulic) pump?
A well-maintained piston pump can last 20,000 to 40,000 hours in clean industrial environments. Mobile construction and agricultural applications typically see 10,000–15,000 hours, while severe-duty mining applications may only achieve 5,000–8,000 hours due to extreme conditions and shock loads.
How can I tell if a hydraulic or piston pump or motor is bad?
Watch for these warning signs:
- Loss of pressure or flow output
- Unusual whining or knocking noise during operation
- Excessive heat buildup beyond normal operating range
- External oil leaks around seals or housing
- Metallic contamination visible in the hydraulic fluid
What are common piston pump problems and causes of failure?
The most common failure causes are:
- Fluid contamination — particles scoring precision internal surfaces
- Cavitation — from inadequate inlet flow or air ingestion
- Worn seals — caused by heat or incompatible fluid chemistry
- Bearing failure — from misalignment or overload conditions
How much does it cost to rebuild a hydraulic pump or motor?
Costs depend on pump size, brand, and wear extent. Variable displacement piston pump rebuilds typically run $1,800–$3,800 versus $3,200–$7,500 for new OEM units. Fixed displacement pumps generally run $1,200–$2,600 to rebuild versus $2,200–$4,500 new.