Introduction
The excavator travel motor—also called the final drive motor or track motor—is the hydraulic component that powers all machine movement. When it fails, your excavator doesn't creep forward at reduced speed. It stops completely, bringing operations to a full halt and costing you money by the hour.
Travel motor problems follow predictable patterns. Most trace back to hydraulic contamination, worn seals, depleted gear oil, or pressure imbalances caused by skipped maintenance. Catch the warning signs early and diagnose the root cause correctly, and many failures can be resolved without replacing the entire unit.
That's what this article covers: the most common travel motor problems, how to identify their root causes, a step-by-step fix process, and when professional repair makes more sense than a full replacement.
Key Takeaways
- Common travel motor failures include power loss, oil leaks, grinding noises, one-sided movement, and high-speed mode failure
- 70–80% of hydraulic failures stem from fluid contamination, worn seals, or low fluid levels
- Follow a 4-step diagnostic process: observe symptoms, confirm root cause, apply the correct fix, and test under load
- Severe internal damage makes professional rebuild more cost-effective than DIY repair or full replacement
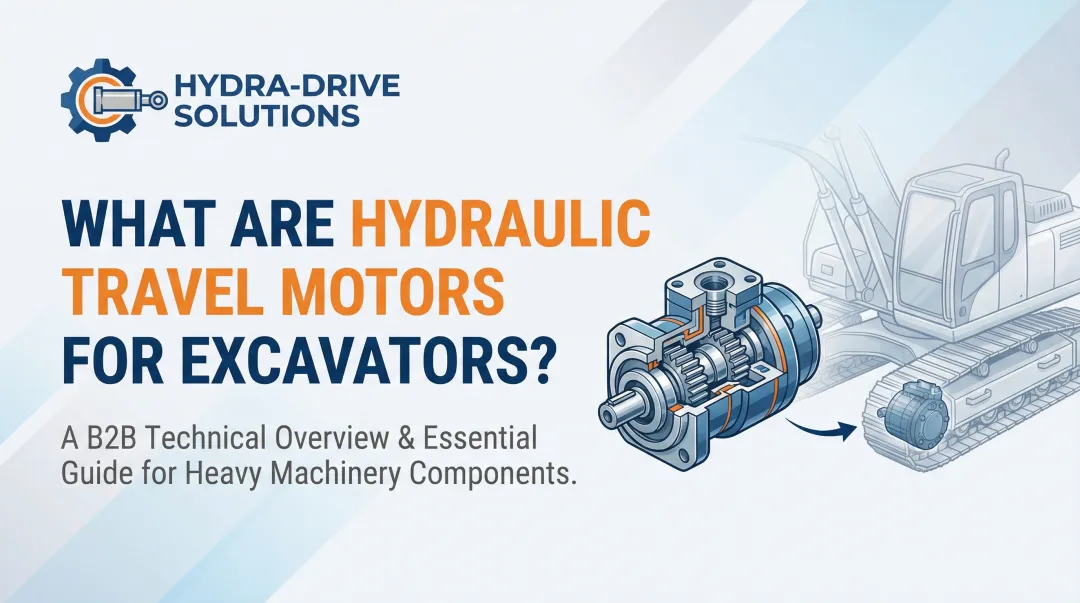
What Is an Excavator Travel Motor?
The travel motor is a hydraulic motor that converts hydraulic pressure from the main pump into rotational force to drive the sprockets and move the tracks. It integrates with a planetary gear reduction system inside the final drive housing, multiplying torque and delivering the power needed to propel the machine's undercarriage.
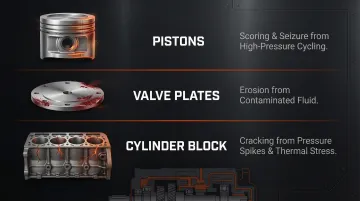
Operating under continuous hydraulic pressure (often exceeding 34,000 kPa / 5,000 psi) and constant mechanical load, wear and failure are inevitable without proper maintenance. The motor's internal components work in extreme conditions, leaving them vulnerable to multiple failure modes:
- Pistons — susceptible to scoring and seizure under high-pressure cycling
- Valve plates — prone to erosion from contaminated fluid
- Cylinder blocks — vulnerable to cracking from pressure spikes and thermal stress
Most Common Excavator Travel Motor Problems
Travel motor failures almost always announce themselves before they become catastrophic. Knowing which symptom points to which root cause cuts diagnostic time and prevents unnecessary parts replacement.
Problem 1: Loss of Power or Slow, Sluggish Movement
Symptoms:
- Excavator moves slower than normal
- Struggles on inclines or cannot reach full operating speed under load
- Both tracks affected equally or one side noticeably weaker
Likely Causes:
- Insufficient hydraulic pressure from the main pump or charge pump
- Internal leakage within the travel motor bypassing fluid around worn pistons or valve plates
- Contaminated hydraulic fluid reducing flow efficiency and accelerating component wear
- Weak charge pump not generating adequate pressure to maintain backpressure or engage high-speed mode
Problem 2: Oil Leaks from the Travel Motor or Final Drive
Symptoms:
- Visible oil pooling beneath the machine after sitting overnight
- Wet or oily residue around the gearbox cover, sprocket area, or case drain line
- Hydraulic fluid mixing with gear oil (appears milky or grey when drained)
Likely Causes:
- Worn or damaged seals (O-rings, lip seals, floating seals) allowing fluid to escape
- Casing distortion from physical impact or overheating
- Pressure build-up in the gearbox forcing fluid past seals — often caused by a blocked case drain line that restricts the low-pressure return path
Problem 3: Grinding, Screeching, or Abnormal Noises
Noise from the travel motor or final drive is rarely subtle — and it escalates quickly without intervention. The source of the sound usually narrows the cause to one of three areas.
Symptoms:
- Loud mechanical grinding or screeching during travel, particularly under load or at startup
- May be accompanied by reduced drive performance or vibration
- High-pitched whining that increases with travel speed
Likely Causes:
- Worn or damaged gears in the final drive gearbox experiencing metal-to-metal contact
- Contaminated or depleted gear oil providing insufficient lubrication
- Damaged bearings within the travel motor creating friction and noise
Problem 4: Excavator Pulling to One Side or Only Moving on One Side
Symptoms:
- Machine drifts or only tracks in one direction
- One track moves noticeably slower or not at all
- Operator must constantly correct steering to maintain straight-line travel
Likely Causes:
- Faulty hydraulic motor on the affected side with internal damage or leakage
- Internal failure in one final drive (seized gears, broken components)
- Blockage in the rotary manifold or centre swivel joint restricting flow to one travel circuit — a common issue around the 5,000-hour mark
Problem 5: High-Speed Mode Failing to Engage
When the two-speed function stops responding, the cause is almost always hydraulic pressure or internal bypass — not an electrical fault, though the solenoid is worth checking first.
Symptoms:
- Machine cannot shift into faster travel mode
- Operates only at low speed regardless of operator input
- May hear a squealing noise when attempting to engage high speed
Likely Causes:
- Malfunction in the speed control system or hydraulic solenoid that shifts the displacement
- Weak charge pump that cannot generate sufficient pressure to trigger the two-speed function
- Internal leakage within the travel motor bypassing the speed shift circuit
How to Diagnose and Fix Excavator Travel Motor Problems
Attempting repairs without first confirming the root cause leads to unnecessary parts replacement, recurring failures, and avoidable downtime. Isolate the correct cause before touching any components.
Step 1: Observe and Document Symptoms
Record all observable symptoms:
- Noise type and when it occurs (startup, under load, continuous)
- Visible leaks and their exact location
- Whether the issue is one-sided or bilateral
- Any performance deviations from normal operation
Perform initial checks:
- Check hydraulic oil level and condition (look for milky appearance or metal particles)
- Check final drive gear oil level at both hubs
- Inspect for visible leaks at motor housing, case drain line, and seal areas
- Note whether warning indicators or alarms are active
Step 2: Confirm the Root Cause Category
Determine whether the failure is:
- Hydraulic (pressure/flow issues, fluid contamination)
- Mechanical (worn gears, damaged bearings, broken seals)
- Operational/environmental (excessive track tension, overloading, overheating)
Rule out external contributors first:
- Confirm hydraulic pressure at the travel motor circuit against service manual specs
- Check track tension (should typically allow 10-30 mm deflection when measured with a straight edge)
- Inspect swivel joint for internal leakage before assuming the motor itself has failed
Step 3: Apply the Correct Fix
For hydraulic issues:
- Flush and replace contaminated hydraulic fluid
- Inspect and replace filters, particularly the case drain filter (keep case pressure under 20 PSI)
- Restore correct pressure levels using a pressure gauge at test ports
- Replace faulty charge pump components if pressure tests confirm inadequacy
For mechanical issues:
- Replace worn seals, O-rings, and gaskets to address leaks
- Inspect and replace damaged gears or bearings in the final drive gearbox
- Change gear oil if contaminated or depleted (typical intervals: initial change at 250 hours, then every 1,000-2,000 hours depending on brand)
- If internal motor components (pistons, valve plates, swash plates) are worn, disassembly by a hydraulic specialist is required — this is not a field repair
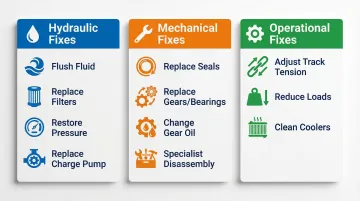
For operational/environmental issues:
- Adjust track tension to manufacturer specification
- Reduce operating loads to within rated capacity
- Clean hydraulic coolers and radiators to restore proper fluid temperature control
Step 4: Test and Validate
After completing repairs, run the excavator under both normal and peak load conditions before returning it to service. Watch for these indicators:
- Confirm travel speed and straight-line tracking
- Test ability to climb grades
- Check that high-speed mode engages cleanly
- Monitor for recurrence of symptoms, unusual noise, or fluid leaks over the first several operating hours
If issues persist after initial repairs, stop replacing parts and escalate to professional disassembly and inspection. Hydrostatic Pump Repair handles travel motor and hydraulic motor rebuilds across a broad range of excavator makes — call 800-361-0028 to discuss your repair.
Fix vs Replace Your Excavator Travel Motor
Three factors drive the fix-or-replace decision: how severe the internal damage is, how many hours the machine has logged, and whether the wrong call risks more downtime than it saves.
Fix when:
- The issue is limited to seals, gear oil contamination, a clogged case drain filter, or a repairable pressure/solenoid fault
- A professional rebuild restores reliable performance at lower cost than a replacement unit
- The machine has moderate hours and the travel motor hasn't experienced catastrophic failure
Replace when:
- Internal components such as pistons, cylinder block, valve plates, or the motor shaft show severe wear or damage that makes rebuild uneconomical
- The travel motor has very high hours and multiple simultaneous failures
- Cumulative repair costs rival the price of a replacement unit
- OEM remanufactured units typically run 45–85% of new cost and carry comparable warranties — worth factoring into the total cost comparison
Preventing Excavator Travel Motor Failures
The most expensive travel motor failures don't happen without warning — they follow ignored symptoms and skipped maintenance intervals.
Preventive actions to implement:
Fluid and Filter Maintenance
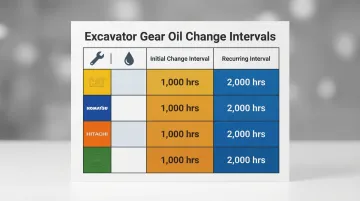
- Change final drive gear oil at manufacturer-recommended intervals:
| Brand | Initial Change | Recurring Interval |
|---|---|---|
| Caterpillar | 250 hours | Every 2,000 hours |
| Komatsu | 250 hours | Every 1,000 hours |
| Hitachi | 500 hours | Every 2,000 hours |
| John Deere | 250 hours | Every 1,000 hours |
- Regularly inspect and replace the case drain filter
- Check hydraulic fluid condition and level before each shift
- Target ISO 4406 cleanliness code of 18/16/13 for mobile hydraulic systems
Operational Monitoring
- Verify track tension daily, especially in muddy or abrasive conditions
- Monitor operating temperatures and avoid sustained overloading or high-impact applications beyond the machine's rated capacity
- Clean hydraulic coolers and oil coolers regularly to prevent heat-related seal degradation
Documentation
- Keep a maintenance log documenting fluid changes, filter replacements, and any unusual symptoms
- Share that log with any repair technician — documented patterns often reveal the root cause faster than physical inspection alone
Frequently Asked Questions
What are the symptoms of travel motor problems in excavators?
Common signs include sluggish or one-sided movement, grinding or screeching noises during travel, oil leaks near the final drive housing, difficulty climbing grades, and inability to engage high-speed mode. Any combination of these symptoms warrants immediate investigation.
How to tell if a final drive is bad?
A bad final drive typically presents as noisy operation (grinding or whining), power loss under load, visible gear oil leaks, or a track that lags behind the other. A gear oil sample showing metal particles is a strong indicator of internal gear or bearing wear requiring immediate attention.
Why does my excavator track slow?
Slow track movement usually points to insufficient hydraulic pressure (weak charge pump or main pump), internal leakage in the travel motor, a stuck high-speed valve, or excessive friction from over-tensioned tracks or worn undercarriage components. Check hydraulic pressure first before assuming motor failure.
What is the number one cause of final drive failure?
Hydraulic fluid contamination and neglected gear oil maintenance are the most frequently cited root causes—dirty fluid accelerates wear on internal components, while depleted or degraded gear oil leads to overheating and premature gear and bearing failure. Research confirms that 70-90% of hydraulic failures trace back to contamination.
Can you rebuild a final drive?
Final drives and travel motors can be professionally rebuilt—disassembled, inspected, and reassembled with new seals, bearings, and worn components. Rebuilding is often a cost-effective alternative to full replacement, typically running 45-85% of a new unit's cost.
How does an excavator travel motor work?
The travel motor converts hydraulic pressure from the main pump into rotational mechanical force. That force is then reduced and amplified through a planetary gear system in the final drive housing, turning the sprocket and driving the tracks. Operating pressures typically exceed 34,000 kPa (5,000 psi).