Introduction
Final drive seal replacement is a precision-dependent procedure that experienced in-house technicians can handle—but only with strict cleanliness protocols, correct tooling, and careful sequencing. Many operators struggle with premature seal failure after replacement because critical steps like bearing tension adjustment or housing surface cleaning were rushed or skipped.
When failing seals are ignored or replaced incorrectly, the consequences escalate fast. Unchecked fluid loss starves internal components of lubrication, while dirt, grit, and moisture accelerate wear on bearings, gears, and shafts.
Caterpillar explicitly states that contaminated lube oil is the most common and preventable cause of component failure—and a compromised seal is the primary entry point. What starts as a minor weep can progress to total final drive failure costing thousands more than a timely seal job.
Follow this guide and you'll finish the job with seals installed correctly the first time—avoiding the re-failure patterns that send final drives back to the shop weeks later.
Key Takeaways
- Final drive seals—especially face/floating seals—keep gear oil in and contamination out; when they leak, internal components are at serious risk
- Always remove the drive from the machine before replacement—in-situ work almost always fails due to new seal spring pressure
- Thorough housing cleaning and bearing tension adjustment are mandatory before fitting new seals—skipping either guarantees premature failure
- Never reuse old seals, never use metal tools on rubber components, and always match OEM-specification seal kits to your exact machine model
- Bearing wear, scored races, or contaminated oil found during replacement signal the need for a professional rebuild—not another seal swap
What Are Final Drive Seals and Why Do They Fail?
The Four Main Seal Types in a Final Drive
Final drives contain multiple seal types, each with a distinct role in keeping fluids separated and contamination out:
- Face Seals / Floating Seals / Duo-Cone Seals — the most critical type. Two precision-ground metal rings and two rubber O-rings (toric rings) press together at the hub-axle interface, keeping gear oil in and abrasive contamination out.
- Lip Seals — radial seals on the axle shaft that separate hydraulic fluid in the main housing from the axle hub area, preventing cross-contamination between fluid systems.
- Quad O-Ring Seals — found in radial piston final drives, sealing the cam ring and brake housing to the main housing to stop hydraulic fluid from migrating between chambers.
- Brake Piston Seals — maintain hydraulic integrity within the brake housing, preventing leakage and maintaining accurate brake application.

Warning Signs of Seal Failure
Seal failure rarely happens without warning. Watch for these indicators:
- Visible oil weeping or pooling around the hub, especially after the machine has been parked overnight
- Gear oil contamination—oil that contains abrasive particles, takes on a milky appearance (indicating moisture ingress), or shows metal flakes
- **Sluggish or uneven track travel**, often more pronounced on one side
- Unusual grinding or whining from the final drive during operation, signaling internal component distress
Why Final Drive Seals Fail
Contamination and normal wear top the list. Abrasive particles—dirt, sand, grit—enter through compromised seals and erode the precision-ground seal faces, gears, and bearings. Contamination ingress causes rapid surface pitting and shaft scoring, accelerating the failure cycle.
Heat cycling degrades the rubber O-ring through "compression set"—the ring loses its ability to press the metal faces together under load. Once that clamping force drops, leakage begins even if the metal rings look undamaged.
Improper installation is a common and avoidable cause. Metal tools that nick the O-ring, wrinkles or twists left in the rubber during assembly, and skipping lubrication all lead to early seal collapse—often within the first few hundred hours.
Delayed maintenance turns a minor seep into a major repair. A leaking seal left unaddressed causes the final drive to run low on oil, leading to near-certain bearing and gear damage. At that point, a new seal alone won't save the unit.
Before You Start: Prerequisites, Safety and Tools Required
Compatibility and Safety Checks
The final drive must be removed from the machine before seal replacement begins. The spring pressure from new seals prevents drawing the casing halves close enough to refit the retaining nut, bolts, or circlip in situ, and gravity is needed to set the seal correctly. Refer to your machine's service manual for the correct removal procedure.
Before work begins, confirm these non-negotiables:
- Machine fully lowered and secured on level ground
- Hydraulic pressure fully relieved—OSHA 29 CFR 1910.147 mandates isolation from energy sources and relief of all stored energy
- Clean, level work area with adequate lighting
- Correct PPE in place (safety glasses, gloves, steel-toed boots)
- Correct OEM seal kit confirmed for the specific make, model, and serial number before disassembly starts
Tools and Parts Required
Essential Tools:
- Pry bar for popping old seals
- Plastic blunt-edged pusher tool (metal tools will damage rubber)
- Lint-free cloths for cleaning housing surfaces
- Light lubricant for O-ring fitting (isopropyl alcohol works well for this)
- Punch and hammer for removing retaining pins
- Torque wrench rated for the manufacturer's nut specification
- Clamp capable of drawing hub and spindle together under the spring load of new seals
Parts:
Always use OEM-specification seal kits matched to the exact machine serial number. Seal materials are selected for specific fluid compatibility, operating temperature, pressure, and shaft speed, so off-spec substitutes will fail early.
If a failed final drive seal has caused damage beyond the seal itself—contaminated hydraulic fluid, worn motor components, or internal damage—Hydrostatic Pump Repair specializes in rebuilding hydrostatic pumps and motors to OEM specifications across agricultural, construction, and material handling equipment.
How to Replace Final Drive Seals: Step-by-Step
Seal replacement follows a fixed sequence. Skipping or abbreviating any step—especially cleaning, bearing tension checking, or seal seating—typically results in a second failure within the first 50–100 hours of operation.
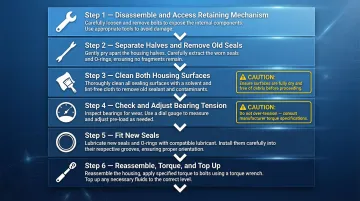
Step 1: Disassemble to Access the Retaining Mechanism
Remove the drive cover and gearsets to expose what holds the two casing halves together. You'll encounter one of three configurations:
- Circlip or two half-moon retaining rings (simplest—just remove)
- Large retaining nut with a locking pin that can be knocked down, or pins requiring drilling and extraction
- Large retaining nut secured by grub screws located in the top or side of the nut
Note that nut torque varies enormously by machine size. Research the manufacturer's specification before applying force to avoid thread destruction.
Step 2: Separate the Casing Halves and Remove Old Seals
Once the retaining mechanism is undone, separate the two halves. Use a pry bar to pop the old seals out carefully. Treat disintegrating seal particles as a contamination risk — remove all fragments and debris completely before moving on.
Step 3: Clean Both Housing Surfaces Completely
Using lint-free cloths, wipe both tapered housing surfaces clean. Pay particular attention to the O-ring groove — even a single grain of sand trapped between the metal ring surfaces will destroy the new seal. Any remaining debris or surface roughness means the replacement seal will leak from day one.
Step 4: Check and Adjust Main Bearing Tension Before Fitting New Seals
This step must happen before the new seals go in. Checking bearing tension with seals fitted is impossible because the spring pressure from the seal provides a false reading.
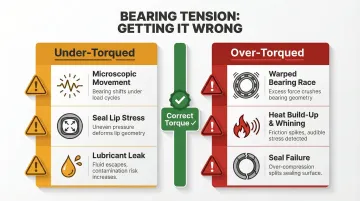
High-hour drives frequently require bearing tension adjustment to compensate for wear — overlooking this is one of the most common causes of repeated seal failure. Getting the torque wrong in either direction causes damage:
- Under-torquing allows microscopic movement during operation, stressing the seal lip and causing leaks
- Over-torquing warps bearings, produces high-pitched whining, and triggers seal failure from excessive heat
Step 5: Fit the New Seals
Position the new seal so the O-ring catches just inside the lip of the tapered housing—not pressed fully home. The seal will only reach its final seated position when the two halves are drawn together.
Apply light lubrication to the O-ring. The O-ring must be completely wet with an approved lubricant (such as isopropyl alcohol) to prevent twisting during installation. Once lubricated, use the plastic pusher tool to smooth the rubber fully — no wrinkles or humps. Verify the seal will not pop out under gentle hand pressure before proceeding. Misalignments, twists, and bulges in the rubber O-ring will cause seal failures.
Step 6: Reassemble, Torque, and Top Up
Use a clamp to draw the hub and spindle together against the spring load of the new seals until the nut, bolts, or circlip can be started. Torque the retaining nut to the manufacturer's specified value.
Reinstall gearsets and the drive cover. Top up the gear oil to the correct level for the machine before reinstalling the drive. Run an initial movement test to confirm no leaks.
Common Final Drive Seal Replacement Problems and Fixes
Even careful installations run into trouble. Here are the three most common problems technicians encounter during final drive seal replacement — and how to resolve each one.
Seal Won't Seat or Keeps Popping Out
Problem: The new seal sits unevenly or pops back out of the housing before or during reassembly.
Cause: Residual debris or old seal material remains in the O-ring groove of one or both tapered housing surfaces. Even a small amount of compacted debris prevents the O-ring from catching correctly.
Fix: Fully disassemble again and re-clean both housing surfaces until they are smooth and completely free of debris.
Casing Halves Won't Draw Together
Problem: The two halves of the final drive case cannot be pulled close enough to start the retaining nut, bolts, or locate the circlip.
Cause: The combined spring pressure of the new seals exceeds hand or gravity force, which is normal. This is why in-situ replacement is not recommended and why a clamp is a required tool.
Fix: Apply a mechanical clamp across the hub and spindle to compress the spring load while starting the nut or locating the circlip. Do not use heat or force on the casing itself, as this risks distortion.
New Seal Leaks Shortly After Return to Service
Problem: The replacement seal shows signs of leaking within a short period of machine operation.
Cause: One of three things typically went wrong:
- An incorrect or off-spec seal kit was used
- The rubber O-ring was installed with a wrinkle or hump — invisible under compression, but it creates a leak path under operating pressure
- Unchecked bearing tension left excess play that loads the seal unevenly
Fix: Confirm the seal kit specification against OEM data. Re-inspect the installation sequence. If bearing play is confirmed, adjust tension and replace the seal again. If leaks persist after a correct reinstall, schedule a full internal inspection — the issue likely goes beyond the seals.
Pro Tips for Final Drive Seal Replacement
Before starting, keep these field-tested rules in mind:
- Replace seals in matched pairs. Do both sides of the hub simultaneously, even if only one side is leaking. The opposite seal has logged the same operating hours and contamination — leaving it in place means repeating the entire job very soon.
- Document before you disassemble. Photograph the retaining mechanism type, locking method, and torque specification before anything comes apart. That information is far harder to find mid-job, and incorrect torque — too low or too high — causes immediate loosening or housing damage.
- Recognize when seal replacement isn't the right fix. Scored or pitted bearing races, discolored gear oil, or excessive bearing play that can't be corrected by tension adjustment all point to a drive that needs a full rebuild — not another round of seal work.
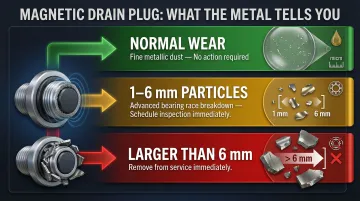
Always inspect the magnetic drain plug during disassembly. Metal deposits between 1 and 6 mm indicate advanced bearing race breakdown; particles larger than 6 mm mean the equipment should be taken out of service immediately for repair.
If you're unsure whether your drive needs seals or a full rebuild, Hydrostatic Pump Repair provides diagnostic and inspection services for hydraulic motors and final drive components. Call 800-361-0028 to speak with a technician before committing to a repair path.
Conclusion
The quality of a final drive seal replacement comes down to preparation and discipline. Correct housing cleaning, bearing tension verification, OEM-spec seals, and proper tooling are not optional steps. Each shortcut directly shortens the life of the new seals and risks the entire drive.
Three principles determine whether this job holds long-term:
- Act early: Address the first sign of a weep — don't wait for a drip to become a drain
- Use the right parts: OEM-spec seals matched to your drive's housing and operating conditions
- Treat replacement as maintenance: Face seals typically last 4,000 to 12,000 hours, depending on load cycles and contamination exposure
A seal kit caught early costs a fraction of a full drive rebuild. Catching it late rarely does.
Frequently Asked Questions
What is a final drive seal?
A final drive seal (also called a floating seal, face seal, or duo-cone seal) is a mechanical seal located where the hub and axle meet. It keeps gear oil inside the drive and prevents abrasive worksite contamination—dirt, grit, and moisture—from entering the internal components.
How to tell if a final drive is bad?
Main indicators include visible oil leaking from the hub area, sluggish or uneven track travel, unusual grinding or whining noise, and visible debris mixed into the gear oil. Early-stage seal failure often starts as a minor seep before becoming a full leak.
What is the number one cause of final drive failure?
Contamination—specifically abrasive particles (dirt, grit, sand) entering through a failed or degraded seal—is the leading cause. Contamination accelerates wear on all internal components and can cause rapid failure even in relatively new drives.
How much does it cost to replace a final drive seal?
OEM seal kits typically run $50–$300 depending on machine size, with labor adding several hours at shop rates. A professional rebuild for a worn drive can range from $1,500 to $5,000 or more, depending on the machine and extent of damage.
How long should a final drive last?
A well-maintained final drive can last 5,000 to 15,000 operating hours or more. Regular gear oil changes, prompt seal replacement, and keeping the drive area clean are what get you to that upper range.
How often should final drive oil be changed?
Caterpillar recommends changing final drive oil every 500 hours for compact equipment, while John Deere recommends every 1,000 hours for compact track loaders. The oil should also be inspected any time a seal is replaced to check for contamination or metal particles.